
Week 9 CSA Newsletter 2019
Week 9 | August 18-24, 2019 | “A” Week
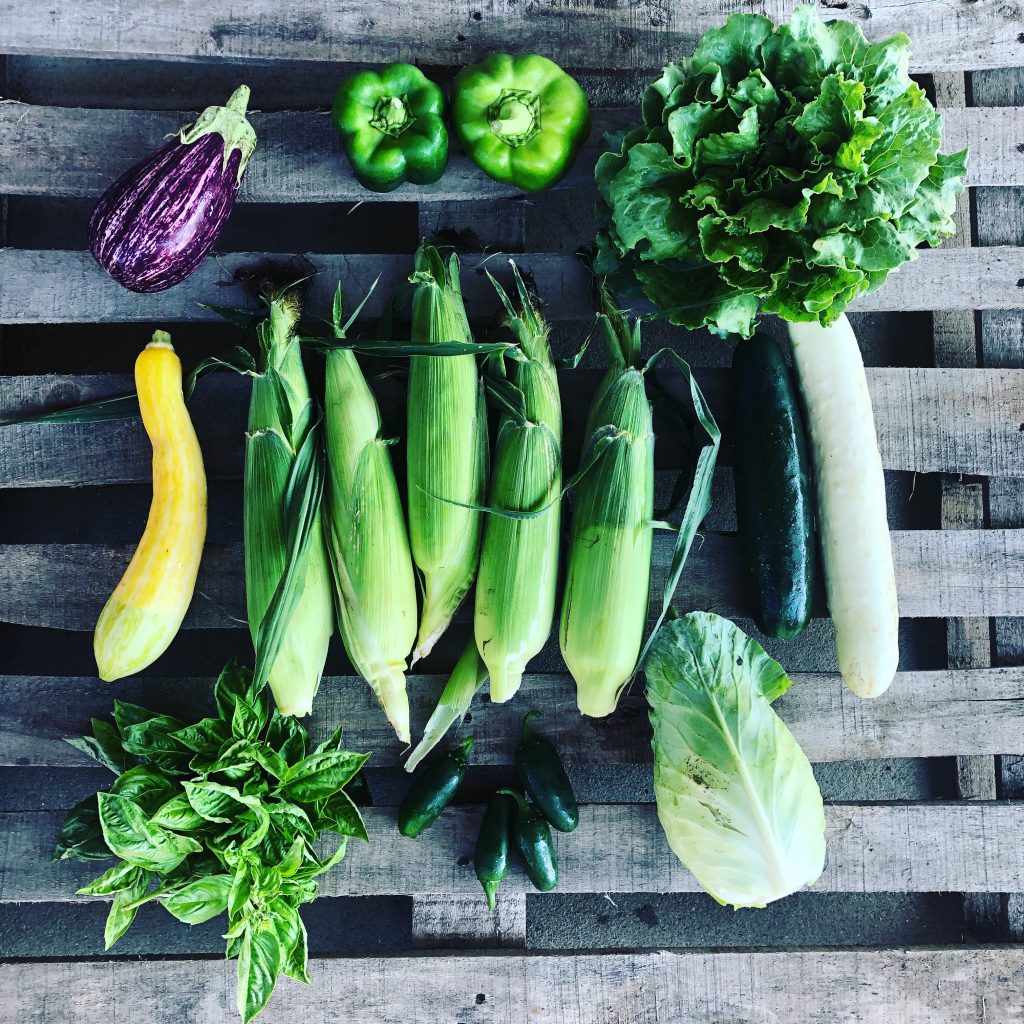
IN YOUR VEGGIE BOX THIS WEEK:
CUT LETTUCE ~ Store this green in a Debbie Meyer Green bag and place in your fridge. Use this within the first 3 days, as it has a VERY short shelf life.
CABBAGE ~ Store this in your fridge and use within a week. Shred it for cole slaw or sauerkraut. Saute it with some garlic and olive oil for a delish side dish.
BELL PEPPER ~ Store this in the fridge in a plastic bag. Peppers can also be flash frozen. Just throw them in a Ziploc bag (whole or chopped) and freeze!
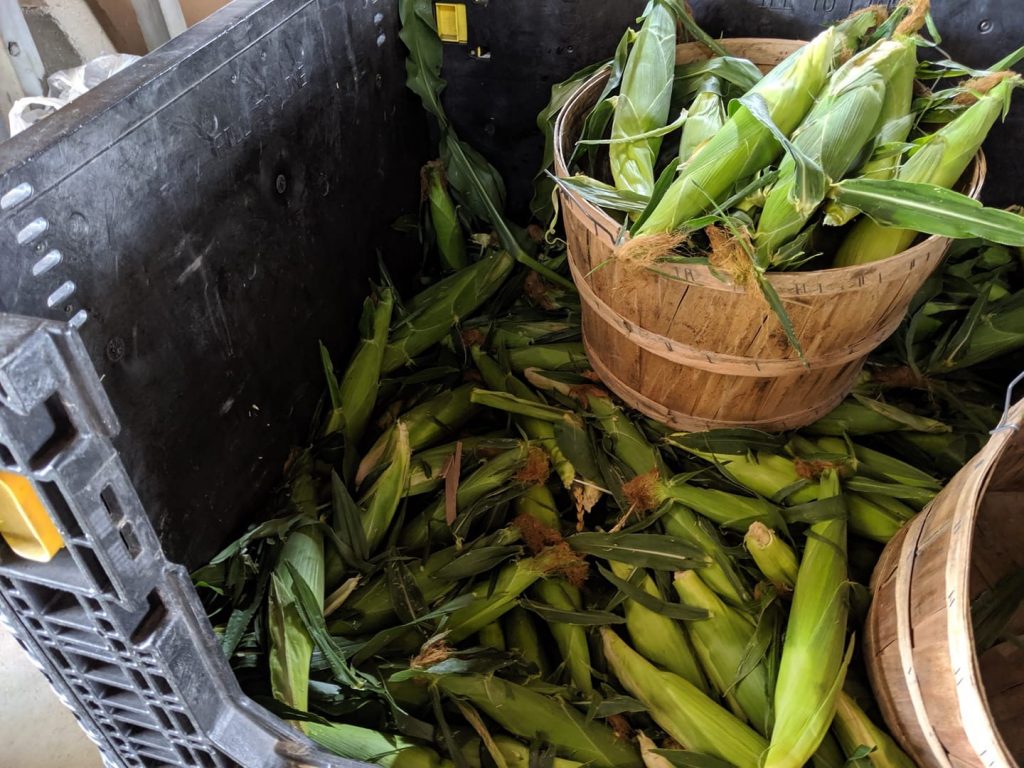
SWEET CORN (not organic) ~ Standard boxes get 5 ears. Large boxes get 10. This sweet corn comes from our parents David and Cindy Bench. They farm this crop conventionally. That’s why we make it an optional item on the extras table, so you will have to pack it yourself. Sweet corn turns starchy the longer you store it, so for best taste, eat this within a few days. Keep the cobs in their husk until ready to use in your fridge. Take off the outer leaves and silks inside when ready to eat. Then remove any worm-damaged tip with a knife. You can also eat this corn raw. Just cut the kernels off the cob with a knife, and add to salads.
SUMMER SQUASH ~ This could take the form of zucchini or yellow squash. Store in your fridge crisper drawer in a Green bag. When you’re ready to eat it, cut the ends off. Peel if desired. If the zucchini is large, cut long-ways, and scoop out the seeds inside. Then dice. Zucchini is also good for making “stuffed zucchini boats!”
CUCUMBERS ~ We don’t have a lot of these yet, so they are going on the extras table, first-come first-serve. These are a new yellowish skinned color. Tell us what you think! Store these in your fridge in a bag and use them within 7 days. You don’t need to peel them, but you will want to wash them to get the spines off.
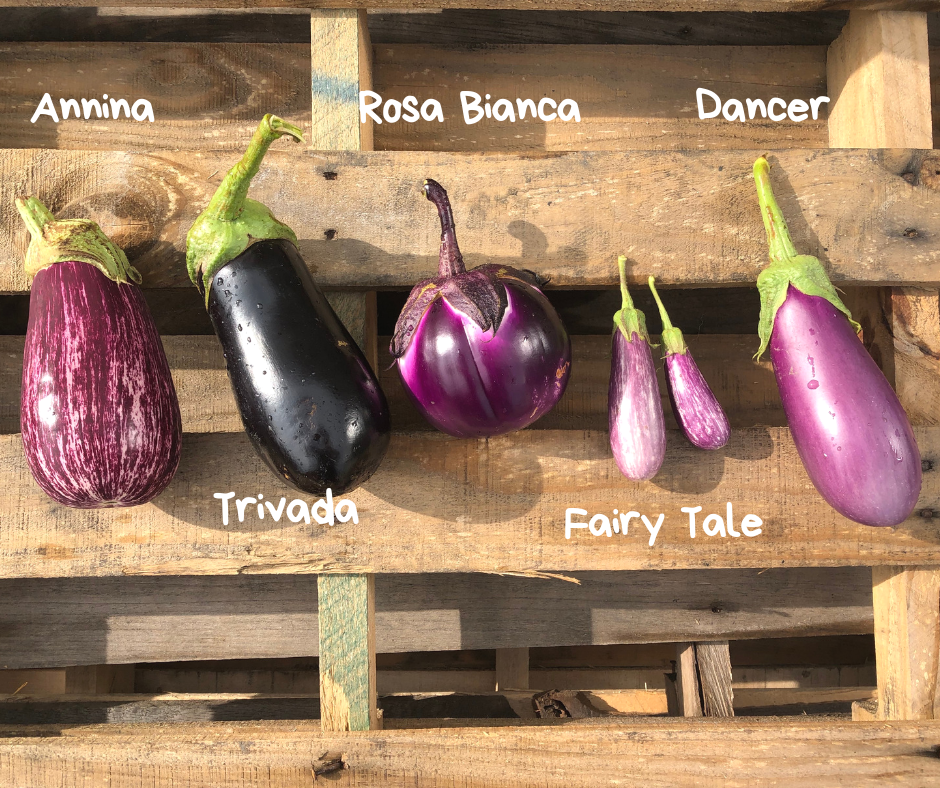
EGGPLANT ~ These purple beauties will be on the extras table since not everyone likes these! There should be enough for those of you who like them! Store this in the fridge in a plastic bag. Peel the skin off before eating.
GREEN BASIL (extras) ~ Keep this outside of the fridge, wrapped in a paper towel, or place in a glass of water like a flower. Use this within a few days as the leaves will begin to go limp. Pesto anyone?…
JALAPENOS (extras) ~ Store this in the fridge in a plastic bag. Peppers can also be flash frozen. Just throw them in a Ziploc bag (whole or chopped) and freeze!
FRUIT SHARE
YELLOW PEACHES ~ One bag of peaches; If the peaches are still hard, leave them out on the counter top until they ripen and soften up. Then refrigerate in a plastic bag. Once you refrigerate them, you stop the ripening process.
BLACKBERRIES ~ half pint. Store in the refrigerator, and eat as fast as possible! (so good).
GALA APPLES ~ One bag of apples. Put these in the fridge in a plastic bag and they’ll store for several weeks.
MADDIE & BELLA COFFEE: Tanzanian Peaberry ~ medium body, rich, uncommonly fruity
WEBER RANCH EGGS: It’s “A” week! Remember, because we doubled up on eggs a few weeks ago to catch up on our over-supply — we will be ending the egg share earlier than the rest of the CSA season.
CHEESE ~ Garlic goat chevre, Charloe, and Wabash Erie Canal
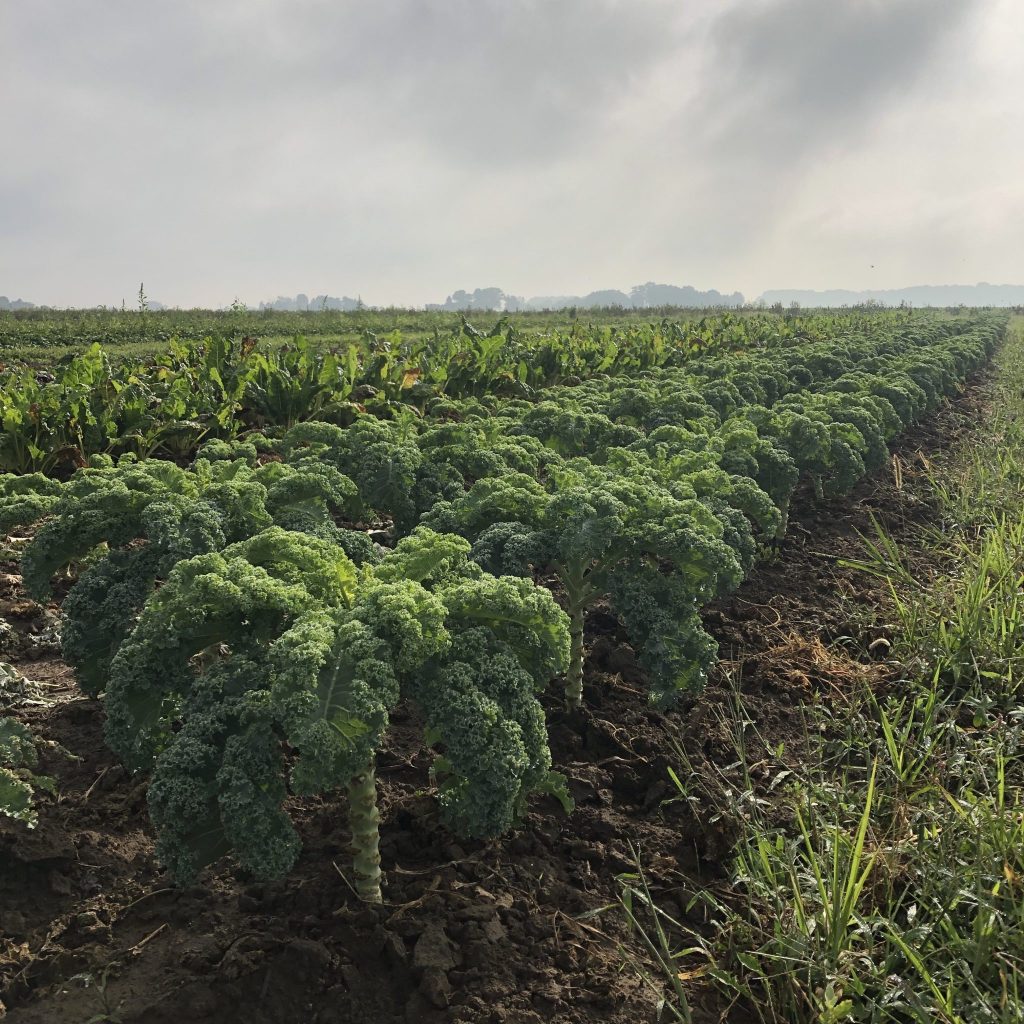
Kale continues to grow taller and taller as you harvest the leaves. Plants sweeten with the first frost!
WEEK 9 ANNOUNCEMENTS
- Tupperware Fridge Smarts for Sale ~ I started using Tupperware Fridge Smarts containers about 6 weeks ago after CSA member Elizabeth Tore gave me some (and wouldn’t stop raving about them.) I use them to store all my highly perishable items now, and I have had REALLY good success with increasing the life of the produce. They are keeping my produce fresh (like lettuces and leafy greens) way longer than the Green Bags. I also like the fact that Tupperware has a lifetime guarantee, AND I’m not having to buy new plastic bags every now and then. So I have asked one of our CSA members (who is a Tupperware consultant) to offer these FridgeSmart containers for sale to the group. NO PRESSURE. I just really love them.The only way to do this is to host an online Tupperware party starting Sunday 8/18 and running through Sunday 8/25. So if you’re interested, here’s the Facebook party link: https://www.facebook.com/events/723566144780436/ To view the catalogs and place your order: https://www.tupperware.com/?party=5d577d1afb1d4ba35e0d8218
- NOW TAKING BULK CORN ORDERS – $28 for 5 dozen ears. Visit our online store link to order.
- Watch our weekly Live Unboxing video this Tuesday around 8 PM inside the private Facebook group. Cadie Jardin, our CSA coach and dietitian, will show you what’s in the box, share storage tips and ideas for how to use your product. You can find the Facebook group at this link.Only CSA members or paying members of the Academy can access this group.
- The Herb Challenge ends this Saturday! Keep tagging your photo entries #slfherbchallenge now through this Saturday, August 24 for a chance to win $100, $75, or $50 off next year’s CSA fee.
KURT’S FIELD NOTES ~ WEEK 9
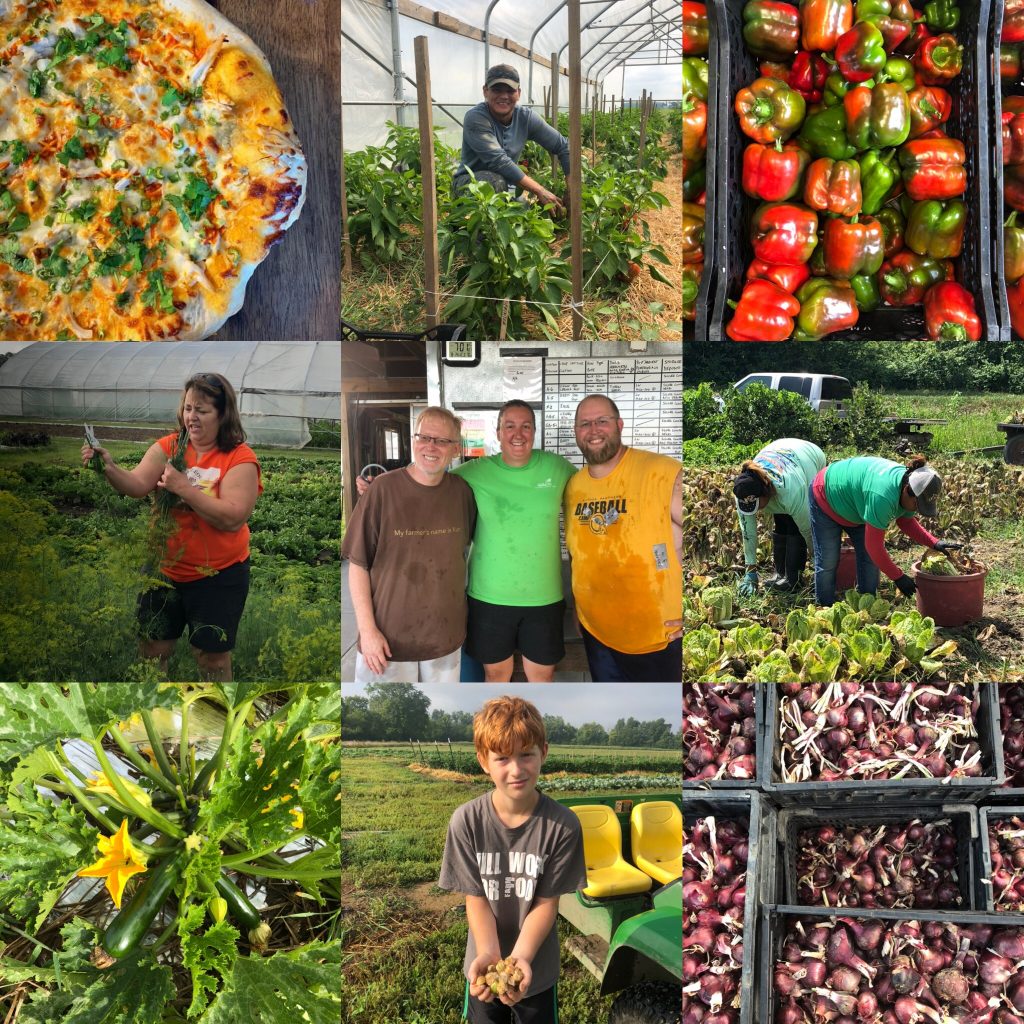
This week the “Great Onion Harvest began.” The crew cleaned about 1/2 acre of onions — all kinds: shallots, cippolinis reds, yellows… The onions are field dried on the poly out in the field for a day or two after they are pulled. Then we collect them in large black crates and bring them into the greenhouses. We’ve set up makeshift drying racks in both houses and as time allows, the crew is pulling them out one by one to cut the green tops off and set them back on the racks. Many of these onions will go to the new Whole Foods in Ohio. But don’t worry — I’ve got PLENTY for all of you.
The crops have now officially “shifted” to summer varieties. You’ll start to see eggplant, peppers, and (soon) tomatoes on the menu as regular guests. The tomato vines are LOADED. It’s going to be a great yield. I’m guessing they’re about a week or 2 away. Thanks for your patience on this. These were planted really late if you recall because I just couldn’t get them in at the regular time with all the rain.
I hired a new guy to help out at the farm — Gabriel. He’s been awesome — a hard worker. Last week, he had the job of stripping the pepper plants of their rotting peppers in the high tunnel. He’s also my regular go-to sweet corn harvester. It’s always a gamble when you hire in a new guy mid-season. Will he get along with the other crew? Will he stick around? Is he a good worker?… I’ve been really lucky to find a solid crew to help us.
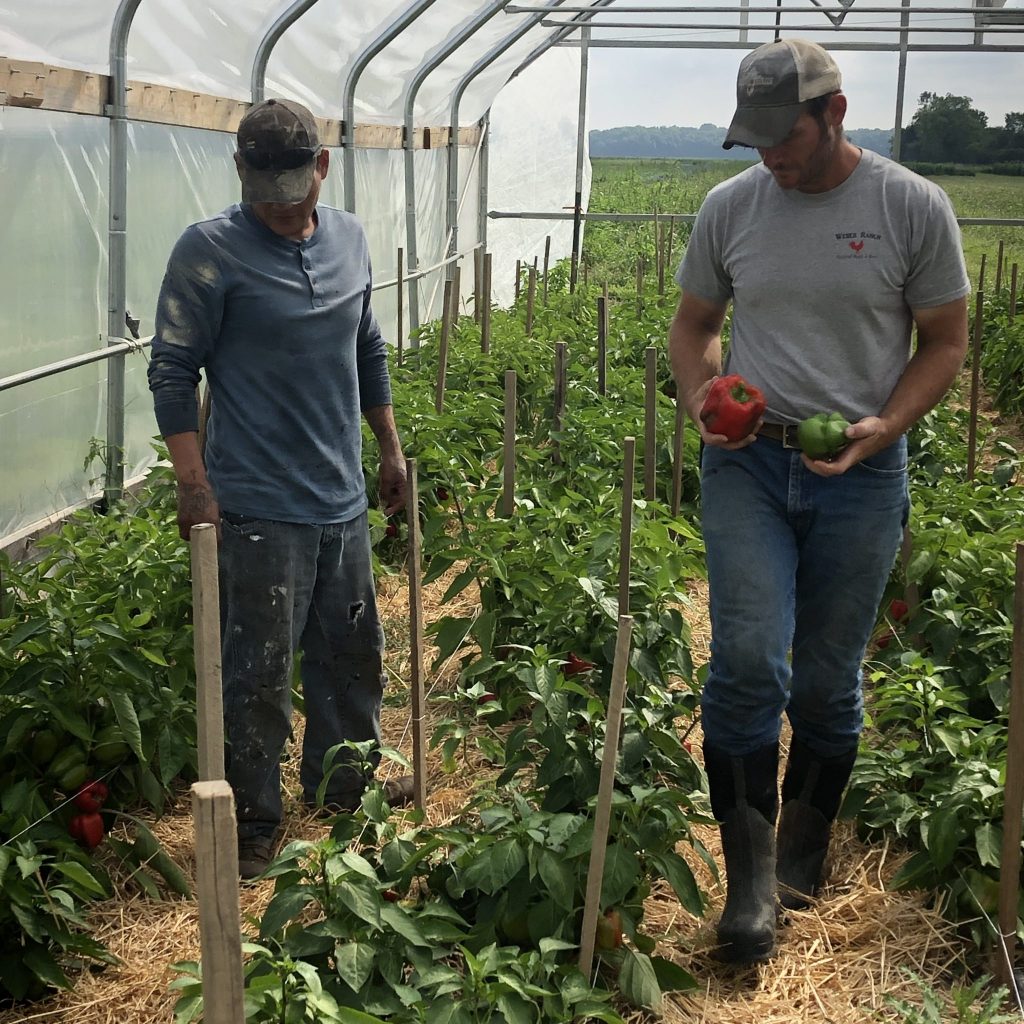
Here’s our new crew member, Gabriel. He was in charge of pulling off rotting peppers.
This week I finally got our drip tape and irrigation installed. You should see the maze of hoses I have meandering all over the fields. It’s crazy. So much for having a nice organized system. My focus on the well and generator has been keeping me from getting this big project done. I ended up working all night on Friday to build a filter and hook everything together. Exahausted, I lay down between the trellised tomatoes and almost fell asleep, wouldn’t you know it — right then the wind picked up and I felt some sprinkles. I quickly got up and put everything away and it started to down pour! We got about 1.5″ of rain this week — we’ll take every bit of it.
We ordered a new regulator for the well’s generator, but when we installed it this week, it didn’t make a difference. So my generator is still not functioning. I am literally stumped — not to mention frustrated by this project. I have decided to put the generator project on the back burner and just rent a generator for now. I can’t keep spending all day on this and let other important jobs go undone. It’s been a hard pill to swallow. My dad always taught me to “Figure it out.” The fact that I can’t seem to do so is killing me. But I have no doubt that we’ll eventually find the solution. The good news is that the rented generator works just fine — the new well is pushing out water like a banshee. I can power TWO farm irrigation systems at the same time. That’s moving alot of water.
Until next week! Farmer Kurt
Sweet corn season! Are you starting to run out of ideas?…
7 Ways to Use Sweet Corn!
Are you starting to feel overwhelmed by the sweet corn?… You’re not alone. This is totally normal for a CSA member right around week 9. So I asked Cadie to come up with some extra support around this topic. Here are 7 ways you can use that sweet corn in the weeks ahead (in case you need some inspiration).
Grill It
There are so many ways to enjoy fresh corn on the grill! Add some fresh herbs to spice it up or homemade herb butter. Have you tried Mexican Grilled Corn, that’s really a showstopper! Check it out here.
Corn Salad
This is probably a go to for most of the CSA members, not only because they have a lot of corn, but because you can also add a large variety of other veggies. Here’s the kicker- YOU DO NOT NEED TO COOK THE CORN. I know most recipes call for blanching or boiling the corn first, but you can skip that step and still impress with this dish! Add some protein on top for a complete meal, or have it as a healthy side dish. Here’s a basic recipe!
Corn Chowder
I know it’s summer, but it’s the perfect time to make a seasonal soup and that means using that corn. Bonus is that this is usually a freezer friendly meal! So if you don’t feel like enjoying it now, save it for football season! Here’s a tasty one!
Freezer Meal Bag
This is one of my go to items during CSA season. I add some ground beef/turkey, a ton of veggies (including corn) and canned tomatoes into a freezer safe bag and DONE. Months from now when I’m too busy to think about dinner, I add that bag to the crockpot and out comes a wonderful dinner. Here’s a quick video on how to make one!
Make Salsa
Everyone loves a good salsa! Throw this on top of a salad, burrito bowl or taco and you’ve really added some flavor to your meal! Here’s one of our favorites, and you guessed it…no cooking required!
Add to something else…pancakes, fritters, and cornbread
This concept works really well for leftover corn if you’re not sure what to do with it and don’t want to throw it away- add it to something. We have had members add to it pancakes for a sweeter batter or to their fritters. Cornbread is mostly cornmeal based, but adding some actual sweet corn takes it up a notch.
Freeze it for winter
Just can’t eat it now? That’s fine! Simply blanch it and save it for the winter, trust me…you’ll be so happy you did. I’m always jealous when my corn is gone and I see members post about their corn in February! Here’s the how to!
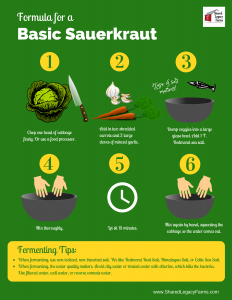
Grab this cheatsheet for how to make a basic sauerkraut inside the Academy under the “Exit Strategy” module. Use your cabbage from this week’s box to make a gut-healthy batch.
WEEK 9 RECIPES
Members: You can download these recipes separately as a PDF inside the Membership Academy. Look under the RECIPES section, Week 9.
Herby Arugula Mint Pesto
Adapted from Cooking Light (www.cookinglight.com)
Serves 8 (~2 Tbs per serving)
Freezer friendly
Works great on anything from veggies, steak or tuna! Try freezing now and using this winter!
Ingredients:
5 cups loosely packed arugula
½ cup fresh mint
¼ cup toasted almonds
½ ounce grated Parmigiano-Reggiano cheese (about 2 Tbsp.)
2 garlic cloves
1 tsp lemon zest
2 Tbs fresh lemon juice
¾ tsp kosher salt
1/3 cup EVOO
2 Tbs warm water
Directions:
Pulse loosely packed arugula, fresh mint, toasted almonds, grated Parmigiano-Reggiano cheese (about 2 Tbs), garlic cloves, lemon zest, fresh lemon juice, and kosher salt in a food processor until finely chopped.
With processor running, slowly drizzle in extra-virgin olive oil.
Add warm water; process until blended. Enjoy!
Sliced Strip Steak with Arugula and Parsley
Adapted from Bon Appetit (www.bonappetit.com)
Serves 4
My favorite way to enjoy arugula is a fresh salad; it’s such a treat that only happens a few times a year!
Ingredients:
2 1-inch-thick boneless New York strip steaks (about 10 ounces each)
Kosher salt and freshly ground black pepper
1 bunch arugula, tough stems removed
¼ medium red onion, thinly sliced
1 red chile, thinly sliced
4 ounces caper berries, halved if large
2 ounces Parmesan, shaved
1 cup parsley leaves with tender stems
2 Tbs fresh lemon juice
2 Tbs EVOO, plus more for drizzling
Directions:
Prepare grill for medium-high heat. Season steaks generously with salt and pepper. Grill, turning several times, until lightly charred, 7–9 minutes for medium-rare. Transfer to a cutting board; let rest at least 15 minutes before thinly slicing.
Toss arugula, onion, chile, caper berries, Parmesan, and parsley in a medium bowl. Drizzle with lemon juice and oil and toss to coat; season with salt and pepper.
Drizzle steak with oil and season with salt and pepper; serve with salad.
Crispy Roasted Cabbage Steaks
Adapted from Dinner then Dessert (www.dinnerthendessert.com)
Total time ~25 minutes
Serves 6
These are so good! Try adding different seasonings!
Ingredients:
1 head cabbage, dark loose leaves removed
Kosher salt and black pepper to taste
2 Tbs canola oil
Directions:
Preheat oven to 400 degrees
Slice the cabbage into ½ inch thick steaks. Brush with oil on both sides and place onto cookie sheet.
Season to taste with Kosher salt and black pepper. Roast for 17-20 minutes or until caramelized.
Serve and enjoy
Curried Corn and Cabbage Soup
Adapted from Food Al (www.foodal.com)
Total time ~25 minutes Serves 6
Try this delicious summer soup loaded with flavor!
Ingredients:
2 Tbs Evoo
1 small (8 oz) russet potato, cut into very small dice
1 small head green cabbage
1 ear fresh corn, uncooked
1 small yellow onion, diced
2 tsp curry powder
4 cloves garlic, minced
5–6 cups vegetable broth or water
1 15-oz can white beans (cannellini or navy)
½ tsp salt, or to taste
freshly ground black pepper, to taste
Directions:
Warm 1 Tbs oil in a dutch oven or other soup pot. Add the potatoes and cook over medium-high heat, stirring every occasionally minutes, until they are tender and golden on all sides, about 7-10 minutes.
While the potatoes cook, remove the core from the cabbage and slice it into thin strips about an inch long. Cut the corn kernels off the cob.
When the potatoes are tender, add the corn and diced yellow onion along with another tablespoon or so of oil. Cook until they start to brown a bit, then add the curry powder and minced garlic. Cook stirring constantly for about 30 seconds, until the garlic is fragrant.
Add the broth or water and bring to a boil. Rinse and drain the canned beans in a colander. Stir in the cabbage and white beans, and bring to a boil again. Cook for about 5 minutes, until the cabbage is tender.
Add a bunch of freshly ground pepper. Stir in salt 1/4 tsp at a time until the soup is seasoned well, to taste.
Serve hot with some fresh garlic bread.
Mesclun Salad
Adapted from Epicurious (www.epicurious.com)
Total time ~15 minutes Serves 4
Enjoy these flavorful greens with homemade dressings!
Ingredients:
1 Tbs fresh lemon juice
½ tsp Dijon mustard
¼ tsp sugar
2 Tbs EVOO
5 ounces mesclun mix (8 cups)
Directions:
Whisk together lemon juice, mustard, sugar, and ½ teaspoon salt in a large bowl until salt and sugar are dissolved, then add oil in a slow stream, whisking until emulsified.
Add greens to dressing and toss to coat. Serve immediately.
Mesclun Salad with Goat Cheese and Maple Glazed Pecans
Adapted from Rachel Ray (www.rachelraymag.com)
Serves 4
This is the most sweet and savory salad you’ll find, and one to impress your guests!
Ingredients:
For the Pecans-
1 cup (4 ounces) pecan halves
2 Tbs real maple syrup
Pinch salt
For the Dressing-
1 small garlic clove, minced
1 Tbs finely chopped shallots
¼ tsp salt
¼ tsp black pepper
1-1/2 Tbs real maple syrup
2 tsp Dijon mustard
2 Tbs red wine vinegar
6 Tbs oil
For the Salad-
10 cups mesclun greens
3 ounces goat cheese (or blue cheese), crumbled
Directions:
For the Pecans-
Preheat the oven to 375 degrees. Lightly oil or line 2 baking sheets with parchment paper. In a small bowl, combine the pecans and maple syrup and toss gently to combine. Spread the pecans in a single layer on one of the prepared baking sheets.
Roast in the preheated oven, stirring once, until the syrup is bubbling vigorously, about 5 minutes. Immediately scrape the glazed pecans onto the other prepared baking sheet, spreading them in a single layer. Sprinkle with a pinch of salt and set aside to cool.
For the Dressing-
In a small bowl, whisk together the garlic, shallots, salt, pepper, maple syrup, mustard and vinegar. Whisking constantly, slowly add the oil in a steady stream. (Alternatively, add all your ingredients to a jar, cover with lid, and shake vigorously to blend.) Set aside.
For the Salad-
Place the greens in a large bowl, drizzle with about half of the vinaigrette and toss to combine. Add as much of the remaining vinaigrette as desired and toss again. Divide among individual plates, sprinkle with the cheese and reserved pecans and serve immediately.
Colcannon (Cabbage and Potatoes)
Adapted from Spend with Pennies (www.spendwithpennies.com)
Total time ~50 minutes Serves 6
Someone in the group was talking to me about this recipe last week, I’m excited to try it out now that potatoes are in our box!
Ingredients:
3 lbs yellow or red potatoes, peeled & quartered
½ cup cream
¼ cup butter
6 slices bacon
1 white onion, diced
½ head of cabbage, about 6 cups
3 tablespoons butter, melted
Directions:
Bring a large pot of salted water to a boil. Cook potatoes 12-15 minutes or until fork tender.
Meanwhile, cook bacon in a large pan until crisp. Set aside to cool, reserve drippings. Add 1 tablespoon of butter to the bacon drippings. Cook onion and cabbage over medium heat in drippings until onion is translucent and cabbage is tender.
Mash potatoes adding cream and 1/4 cup butter as needed. Season with salt and pepper.
Gently fold together mashed potatoes, cabbage & onions and chopped bacon. Top with additional melted butter if desir
Olive Oil Roasted Eggplant with Lemon
Adapted from All Recipes (www.allrecipes.com)
Total time ~15-20 minutes
If you’re new to eggplant I would recommend roasting it!
Ingredients:
1 eggplant
3 Tbs EVOO
salt and pepper
2 Tbs fresh lemon juice
Directions:
Preheat the oven to 400 degrees F. Line a baking sheet with parchment paper or lightly grease.
Slice the eggplant in half lengthwise, then cut each half into quarters lengthwise. Cut each of those in half to make two shorter quarters. Place the eggplant onto the baking sheet with the skin side down. Brush each piece with olive oil and season with salt and pepper.
Roast in the preheated oven until softened and golden brown, 25 to 30 minutes.
Remove from the oven and sprinkle with lemon juice. Serve hot.
Homey Lime Tilapia and Corn Foil Pack
Adapted from Delish (www.delish.com)
Total time ~30 minutes Serves 4
I know this recipe calls for tilapia, but any white fish would work. Foil packs are a great way to avoid extra dishes in the summer!
Ingredients:
4 fillets tilapia
2 T honey
4 limes, thinly sliced
2 ears corn, shucked
2 T fresh cilantro leaves
¼ cup EVOO
kosher salt
Freshly ground black pepper
Directions:
Heat grill to high. Cut 4 sheets of foil about 12″ long.
Top each piece of foil with a piece of tilapia. Brush tilapia with honey and top with lime, corn and cilantro. Drizzle with olive oil and season with salt and pepper.
Grill until tilapia is cooked through and corn tender, about 15 minutes.
Baked Eggplant and Zucchini
Adapted from Rachel Ray (www.rachelraymag.com)
Serves
Simple and delicious main dish, add cooked ground protein if want to!
Ingredients:
2 cups tomato sauce
1 small eggplant, cut into long slabs
2 small zucchini, cut into long slabs
1 cup each shredded fontina and parmesan
1/3 cup torn basil
Directions:
Spread ½ cup sauce in 9-by-13-inch baking dish; top with eggplant, zucchini, ¾ cup sauce and half of each cheese and basil; repeat.
Bake for 25 minutes at 400 degrees. Serve warm.
Pickled Cucumbers and Jalapenos
Adapted from Martha Stewart (www.marthastewart.com)
Makes 2 ½ Quarts
Love this quick pickle that has a kick!
Ingredients:
2 pounds Kirby cucumbers, sliced diagonally ¼ inch thick
4 red jalapenos, sliced diagonally ¼ inch thick
3 small onions, cut into ½ -inch wedges
3 Tbs coarse salt
2 cups cider vinegar
1 ¾ cups packed light-brown sugar
1 Tbs mustard seed
¾ tsp celery seed
¾ tsp ground turmeric
Directions:
In a bowl, toss cucumbers, jalapenos, onions, and salt. Cover; refrigerate 2 hours.
In a saucepan over medium heat, cook vinegar, sugar, mustard seed, celery seed, and turmeric, stirring to dissolve sugar.
Rinse and drain cucumber mixture. Pour vinegar mixture over; let cool. Refrigerate, covered, up to 3 weeks.
Jalapeno and Cucumber Margarita
Adapted from All Recipes (www.allrecipes.com)
I know this group loves their fresh CSA cocktails!
Ingredients:
½ cup tequila, or more to taste
½ cup fresh lime juice
¼ cup orange liqueur
¼ cup simple syrup
1 jalapeno pepper, halved and seeded
4 thin slices cucumber, or more to taste
4 wedges lime
2 Tbs kosher salt, or as needed
ice, as needed
4 slices cucumber
Directions:
Stir tequila, lime juice, orange liqueur, and simple syrup together in a pitcher with a lid; add jalapeno pepper and thin cucumber slices. Refrigerate at least 1 hour.
Run a wedge of lime along the rim of each of four pint glasses. Spread kosher salt onto a flat plate; press glass rims into salt to coat.
Fill glass with ice and pour margarita over the ice. Garnish with cucumber slice.
Mexican Stuffed Peppers
Adapted from From Valerie’s Kitchen (www.fromvalerieskitchen.com)
Total time ~35 minutes Serves 8 Freezer Friendly
This recipe makes a lot, you could even consider freezing the leftover ones!
Ingredients:
6 to 8 bell peppers any color
1- ¼ pounds lean ground beef
2 Tbs taco seasoning
½ cup diced white or yellow onion
1 tsp minced garlic
1 14.5 ounce can fire roasted, diced tomatoes
1 8 ounce can tomato sauce
1- ½ cup cooked long grain white rice see note below
1 4 ounce can diced green chiles, drained
1 15 ounce can black beans, drained
1 cup corn
¼ tsp crushed red pepper optional
1- ½ to 2 cups shredded cheese cheddar, Jack, or Mexican blend
Optional toppings – sour cream thinly sliced green onion, chopped avocado, olives, chopped cilantro, diced tomato, salsa
Directions:
Preheat oven to 400 degrees F.
Slice tops off peppers, remove seeds and trim ribs, if necessary. Place peppers in a baking dish and add about 1″ of water. Cover with foil and bake in preheated oven for 20 minutes, until slightly tender. Remove from oven and reduce oven temperature to 375 degrees F. Remove peppers from baking dish and pour off water. Return peppers to baking dish.
While peppers are in the oven, add 1 Tbs oil to a large saute pan and place over medium-high heat. Add ground beef and cook, stirring to break up the beef, until browned and cooked through. Drain off as much grease as possible from the pan. Return the pan to the heat, add onion and garlic and cook till tender.
Reduce heat to medium and add the taco seasoning, tomatoes, tomato sauce, beans, rice, green chiles, frozen corn, crushed red pepper (if using), and 1 cup cheese. Cook until combined and cheese has melted.
Fill peppers with the beef mixture and return to baking dish. Cover with foil and bake at 375 degrees F for 25 minutes to 30 minutes, or until peppers are very tender and filling is heated through. Remove foil, top with remaining shredded cheese, and bake for an additional 5 minutes until cheese has melted.
This recipe will make enough to fill 6 large or 8 medium sized bell peppers.
Cook your rice before beginning filling. To yield 1-1/2 cups cooked rice, use 1/2 cup rice to 1 cup water and cook according to the package directions.