
WEEK 4 CSA Newsletter 2019
July 14-20, 2019 | “B” Week
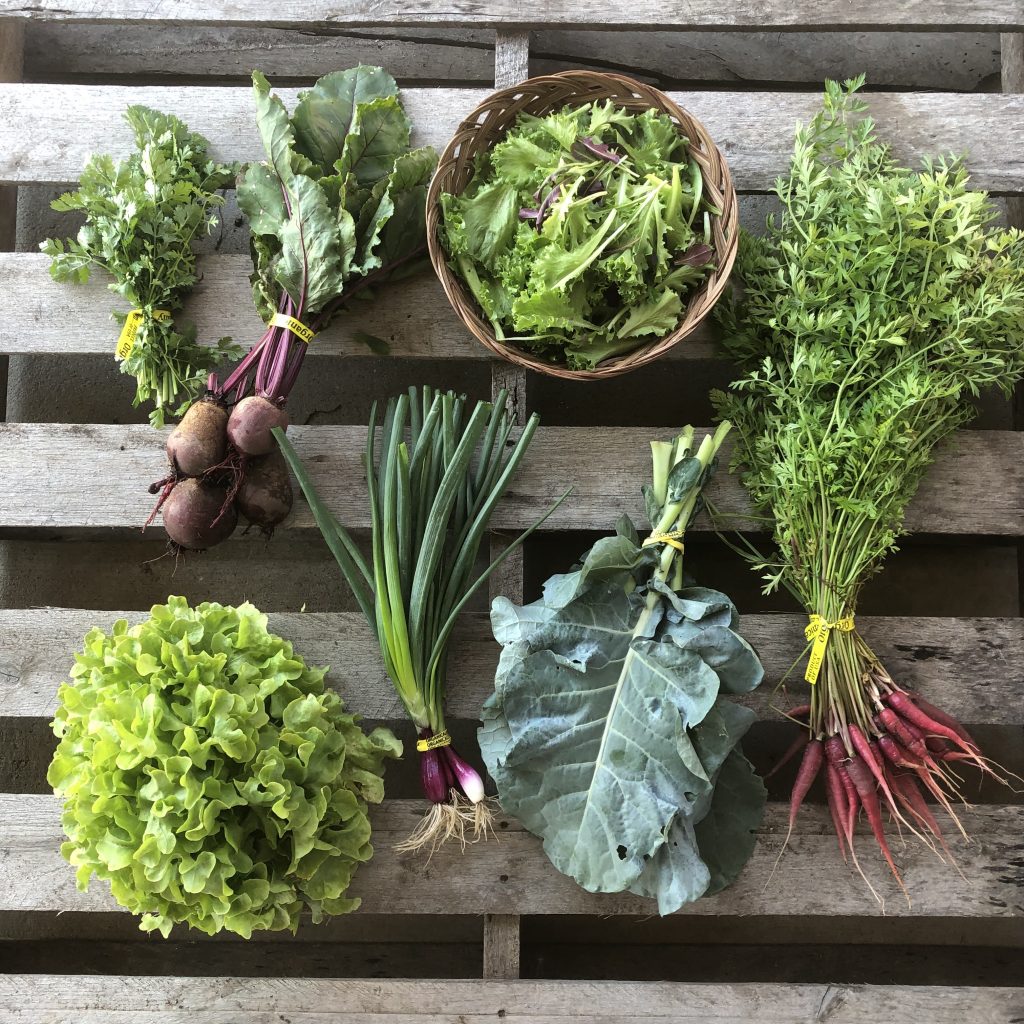
IN YOUR VEGGIE BOX THIS WEEK:
HEAD LETTUCE ~ Put your head lettuce in a Debbie Meyer Green bag right away and leave it in the fridge. Use within a week. Lettuce falls into the category of “danger zone veggies” — ie they are in danger of rotting more quickly than other items. So use your lettuce early on in the week for maximum efficiency. When ready to eat, wash, spin dry in a salad spinner.
CUT LETTUCE ~ You’re also getting “cut lettuce” this week! This is like the stuff you buy in the clamshells at the store. Use this within a week. Store it like you would head lettuce. See above.
GREEN BUNCHING ONIONS ~ Also called scallions. Oops. I put purple ones in the picture! Store these like a flower in a Mason jar of water in your fridge. Cover the green tops with a baggie. They will store this way for WEEKS. The tops can be chopped off and frozen in 1-inch segments in a Freezer bag! Add them to chilis, chicken noodle soup, salad, Mexican dishes.
RED BABY CARROTS ~ These will have a beautiful red skin and will be tiny shorter roots. Kurt’s not sure if the tops will be coming with these yet — depends on how they look at harvest. Cut the tops off the carrots right away and use them for pesto, hummus, or the famous frozen green cubes. Store the roots in a bag in your crisper for 3 weeks. The roots would be great roasted or grilled at this size, especially if you mix them with other colors so they contrast really pops!
BROCCOLI GREENS ~ Woah! Did you know you could eat the leaves of the broccoli plant? You CAN! And they’re really good for you and tasty! Slice out the rib and saute the leaves. Or chop them fine and add to salads. I like to blanch and freeze and add them to soups/stews/green cubes. They’re also good for wraps. Store them in a green bag in your fridge. Use within a week for best texture.
RED BEETS ~ Woo hoo! You’re either REALLY excited to hear the news that beets are here… or really scared. Don’t worry… we’ll help you. Take the tops off your beets and store those separately in a green bag in the fridge. You can blanch them and turn them into green cubes. Or add them into salads raw too. The beet roots should be stored separately in a bag and they will hold for many weeks. Shred them raw into a salad. Roast them with carrots and shallots, or try baking with them. Here’s a beet chocolate cake that’s even gluten-free.
CILANTRO (fresh herb) ~ This herb will be located on the extras table, which means it’s NOT pre-packed in your box. You will have to add it yourself. Cilantro is one of those herbs that you either LOVE or HATE. It’s used in a lot of Mexican, Indian, and Asian cooking and salsas. It looks a lot like parsley, but it has a distinctive soapy taste. To store: place the stems into a glass of water and cover with a baggie. Then store in the fridge and use within a week.
FRUIT SHARE
SWEET CHERRIES ~ (Fruit share) This will be our last week for cherries! Be sure to pit these before eating. If you’re starting to feel overwhelmed by cherries, you can pit them and freeze them on a cookie sheet to enjoy later. Don’t let them go to waste! They are one of the most expensive parts of the fruit share! These cherries come from Quarry Hill Orchard in Berlin Heights, courtesy of Farmer Ben.
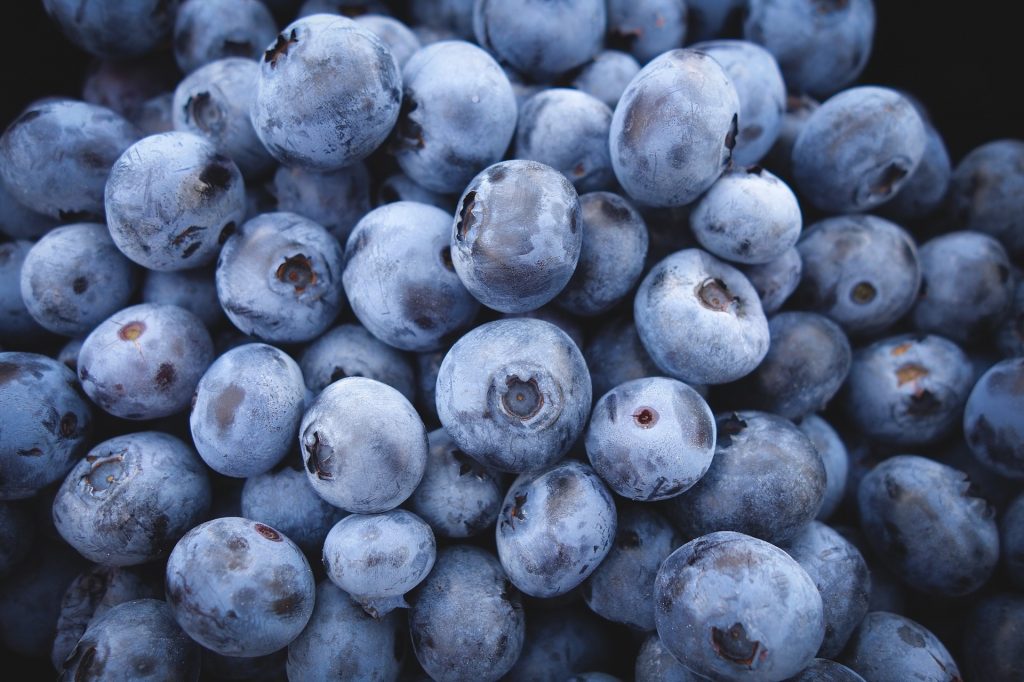
BLUEBERRIES ~ you’ll be getting a pint of blueberries this week from Michigan — sourced through Ben’s connections as a fruit grower. I’m pretty sure you’ll just eat these out of hand in about 5 minutes. If for some reason you don’t eat them right away, refrigerate immediately. We’ll have plenty more for the weeks ahead! I encourage you to consider getting the 10 lb. box of berries in the online store — you can then freeze those to your heart’s content.
RASPBERRIES ~ a half pint portion. These come from Farmer Ben at Quarry Hill. They will last for about a day. So eat them fast. I don’t think you’ll have any trouble with that! Definitely refrigerate!
MADDIE & BELLA COFFEE: El Salvador Strong Tower
WEBER RANCH EGGS: It’s “B” week! B week egg shares will be getting their “double portion” this week. Weekly eggs get their usual portion.
WEEK 4 ANNOUNCEMENTS
- Watch our weekly Live Unboxing video this Tuesday around 8 PM inside the private Facebook group. Cadie Jardin, our CSA coach and dietitian, will show you what’s in the box, share storage tips and ideas for how to use your product. You can find the Facebook group at this link.Only CSA members or paying members of the Academy can access this group.
- SLF Tshirts are for sale this week at your sites. Bring $10. Adults Sizes S, M, L, XL, XXL
- Buy your Taste of the Farm Dinner tickets now. We’ve scheduled this paid dinner event for Sunday, September 8, from 6-9 PM. 125 tickets available. Price: $75 each. Or buy a reserved table for 8 at $600. See details in our article below. Purchase your tickets online here.
- It’s time to pre-order BULK BLUEBERRIES for freezing.
 Every year, we give members a chance to order a 10# box in bulk — in case you want to freeze them. (Remember how last year I FORGOT!? Never again).
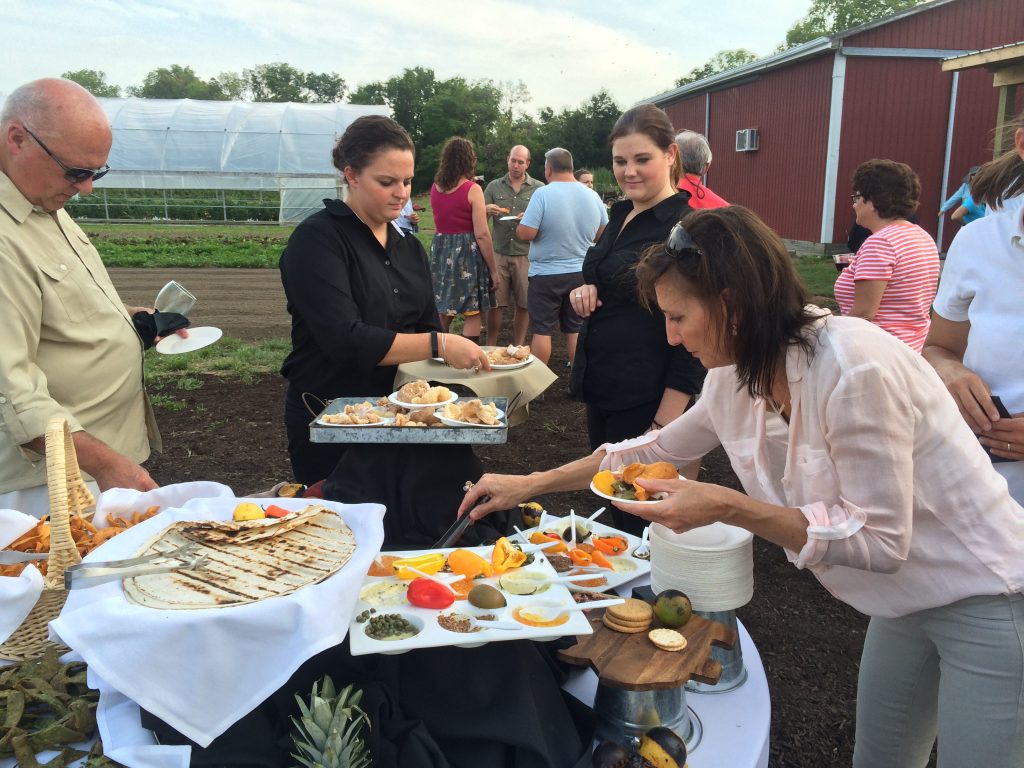
The Taste of the Farm Dinner is Back! Order Tickets now.
It’s back!
Get your tickets now for the Taste of the Farm dinner event served right in our fields. The date is Sept. 8 (Sunday), from 6-9 PM. Cost is $75 per ticket. (Does not include alcohol). You can also get a table for 8 at $600.
The evening is designed to celebrate our season and bring together the many players who help make our farm a success. Walk our fields while sipping our non-alcoholic cocktail drink (or BYO wine or beer), take a self-guided tour of farm, graze on appetizers, then join us for a sit-down meal served “family style” right in our fields with a beautiful view.
We’ve partnered with 4 of our local chefs who are working together to provide a 5 course menu that features our farm’s produce and highlights products from our other partner farms (Weber Ranch, Turkeyfoot Creek, Canal Junction, Quarry Hill, Maddie & Bella’s).
Order your tickets online here. You can also reserve a table of 8 to insure that you sit with your guests.
The profits from this event will be split between 3 organizations fighting food insecurity locally: Food for Thought, Bistro 163, and Jewish Family Service Food Bank. All our chefs and food partners have agreed to donate their products and services so we can make a larger donation to our charities!
NOTE: Due to tight restrictions on serving alcohol offsite, this event does not include alcohol in the ticket price. This event is BYO wine/alcohol. (We’ll provide wine glasses).
Chefs: Marcel Hesseling from Toledo Country Club, Scott Bowman from Fowl and Fodder, Janae Makowski and select PENTA Culinary School students, and Diane Rogers from Syd and Diane’s.

FARMER KURT’S FIELD NOTES ~ WEEK 4
We’re falling into a routine now. Monday, Wednesday and Friday mornings are spent harvesting. Afternoons turn into “everything else” — weeding, seeding, planting, prepping ground, mowing this infernal grass, fixing row cover that’s flown off the beds. The farm looks really good. Except for a bed of beets, the weeds are under control — something I’m pretty proud of! Potatoes are flowering now, which means they’re putting down their tubers. My summer squash and winter squash are looking good. Cucumbers are hit and miss — this crop has been historically challenging for me to grow. I lost the first crop because I couldn’t get them into the ground in time with all the rain, and the plants got too big in the transplant trays. The second crop I tried to direct seed right into the beds (and the birds ate them). This third try will hopefully be the charm. Napa cabbage is heading out nicely thanks to the protection of the row cover against those flea beetles — hopefully in time for next week.
Did you enjoy the “bonus” raspberries last week? Our berry bushes were producing like crazy! So I thought I’d share the bounty with our fruit share members. This year, our gooseberry plants and currant bushes are REALLY going strong. Those are a specialty crop we grow for our chefs and the Toledo Market. I think I’m going to invest in more bushes for next year.
Well Update: No, I still don’t have a functioning well. Any day now, we should have it finalized. Last night Josiah and I rigged up my water wheel planter with the giant water tank, and we did an irrigation pass over the new carrots to try to get them to germinate.
The tomatoes look great. This week, I had the crew “stake” the tomatoes. You can see a picture above that shows how this is done. We use a hand-held stake pounder to pound the stakes in deep. It’s a brutal upper-body workout. About 3 pounds per stake. Luckily it wasn’t too hot the day we had to do it. I do now have a mechanical stake pounder that’s supposed to make this easier on the body. Unfortunately, the ground is so soft that my stake pounder would drive the stakes TOO far into the soil. So I’m back to the manual system this year. So it goes.
On Friday, the crew “tied” the tomatoes (called the Florida Weave). Here’s an old video that shows you how I do this. Look how young Josiah is!!
This next week is “Fair Week.” That’s normally a big deal for fair families. Although we don’t camp out at the fairgrounds, we will be going there a few times to act out our fair duties. It’s “the place to be” for a farmer — kind of like a massive reunion where you can see your extended family and neighbors and catch up on farmer talk too. Especially the livestock auction — I’ll be sure to attend that. See if I can sneak in the purchase of a hog while Corinna isn’t looking…. Jed did a welding project this year. I’m so proud of him. This week, he and I spent some good father-son time, putting that welding project together. We now have two more boot scrapers on the property that will go to good use!
It’s supposed to be really hot next week. (Seems like during Fair week it rains alot and is always hot). I’ll need to make sure our well is working. I can’t wait to turn it on and feel the satisfaction of a difficult project coming to completion. The heat will be good for our summer crops — the tomatoes, peppers, eggplant, basil, sweet corn. Not so good for our broccoli and lettuces. Let’s hope we can keep them from bolting. The corn is looking good. Big Dave and Adam just planted another planting 2 days ago. Corn is seeded every 2-3 weeks so that we can have it all summer and into the early fall.
Until next week! Farmer Kurt
Have You Ever Wondered…?
Why does my sweet corn sometimes have a missing kernel?
Allow me to share some fun sweet corn science that will answer that question.
It’s mid-July, and that means the sweet corn is tasseling! This is the flower of the plant that contains little pieces of pollen that dangle from the flower. Meanwhile… down below, on the top of the forming husk, there are little strings or “silks” forming. You see these silks when you shuck your corn.
As the tassel is visited by insects, and as the wind blows through the field, the pollen falls down below and lands on the silks of the corn husks. Each individual silk will (if pollinated) create one kernel on the cob. So if a silk isn’t pollinated, then that kernel won’t develop! Your ear of corn has all its kernels because the tassel dropped enough pollen to pollinate all the silks of that plant.
So if you see a few missing kernels in your, it means that silk didn’t get fertilized.
Cool, right?
Now don’t get too excited yet! The sweet corn isn’t coming just yet… but it’s close! It was one of the crops that we got in on time before all those rains hit! So we should have a good strong sweet corn crop this year.
WORKSHOP: PESTO WITH A PESTLE
Sat, July 27, 2-4 PM
 Join instructor Diane Rodgers in learning how to make your own pesto using a mortar and pestle. Diane swears that the taste difference between a pestle method and a food processor is significant. Unlike years past this includes ALL the ingredients waiting for you at the farm to make the pesto — olive oil, pine nuts, basil, garlic, salt, cheese. You also get to take home your pesto that you made and enjoy some tasting and snacks. All you need to do is bring your own mortar and pestle.
ORDER HERE: Workshop plus BYO pestle: cost is $45.
Please pre-pay in our online store at the links provided above. NOTE: You must provide a cutting board and knife. Details will be sent home before the workshop to remind you of what equipment to bring.
WEEK 4 RECIPES
Members: You can download these recipes separately as a PDF inside the Membership Academy. Look under the RECIPES course section, Week 4.
SLF Week Four 2019
Vegan Double Chocolate Muffins
Adapted from Minimalist Baker (www.minimalistbaker.com)
Total Time 30 minutes, Makes 12 muffins , Freezer Friendly
This recipe was a HOT one in our Facebook group the past TWO summers! I’m sharing again incase you haven’t seen it! Multiple people have made these and have been successful in getting those picky eaters to eat those beets! I used regular eggs, milk and an all purpose GF flour and it turned out fantastic.
Ingredients:
2 flax eggs (or regular eggs)
1 cup SLF beet puree (or sub butternut squash, applesauce, or another hearty fruit puree)
¼ cup maple syrup (sub honey if not vegan)
⅓ cup brown sugar
¼ tsp sea salt
1 ½ tsp baking soda
¼ cup melted coconut oil or vegan butter (such as Earth Balance)
¼ cup unsweetened almond milk (or regular milk if not vegan)
½ cup unsweetened cocoa powder
1 ⅓ cups whole-wheat pastry flour (or unbleached all-purpose, I used an all purpose GF flour)
⅓ cup dairy-free semisweet chocolate chips + more for topping
Directions:
Roast, boil or steam beets prior to peeling. Peel and puree until smooth.
Preheat oven to 375 degrees and line 12 muffins with paper liners, or lightly grease.
Prepare flax eggs in a large mixing bowl and let rest for 5 minutes OR crack 2 eggs into large bowl.
Add beet puree, melted oil, maple syrup or agave, brown sugar, baking soda, salt and whisk for 45 seconds.
Stir in the milk and whisk once more.
Add cocoa powder and flours and stir with a spoon or spatula until just combined, being careful not to over-mix. If the batter appears too thick, add a touch more almond milk. But it should be quite thick and NOT pourable – rather, scoopable.
Lastly, stir in chocolate chips. Then divide batter evenly between muffin tins (should be enough for between 11-12) and sprinkle with a few more chocolate chips (optional but recommended).
Bake for 17-22 minutes or until a toothpick inserted into the center comes out clean. Let cool for a few minutes in the pan, remove from tins and let cool on a cooling rack.
Roasted Beets and Carrots
Adapted from Epicurious (www.epicurious.com)
Serves 6
Beets are amazing roasted with other root veggies, it’s a great way to introduce them if you’re not familiar with them.
Ingredients:
6 medium beets (2 ½ lb with greens), trimmed, leaving 1 inch of stems attached
2 ½ lb carrots, cut diagonally into 3/4-inch-thick slices
2 Tbs EVOO
Directions:
Preheat oven to 425°F. Wrap beets tightly in foil, making 2 packages, and roast in middle of oven until tender, about 1 1/4 hours.
Toss carrots with oil and salt and pepper to taste in a shallow baking pan.
Remove beets from oven and roast carrots in middle of oven until tender, about 20 minutes.
While carrots are roasting, unwrap beets and, when just cool enough to handle, slip off skins and remove stems. Cut each beet into 6 wedges.
Add beets to carrots, tossing to combine, and roast until beets are hot and carrots are very tender, about 15 minutes more.
Cooks’note:
Beets can be roasted and peeled 2 days ahead and chilled, covered.
Raw Beet Salad with Walnuts and Goat Cheese
Adapted from Umami Girl (www.umamigirl.com)
Total time ~15 minutes Serves 4
My favorite way to eat beets is shredded and raw! I love the flavor and they are a great addition to even a simple green salad.
Ingredients:
3 cups julienned raw beets from 2 to 3 beets, depending on size (see instructions)
½ small red onion, peeled
½ cup chopped walnuts
Zest of 1 orange
1 Tbs EVOO
1 Tbs sherry vinegar
1 Tbs freshly squeezed orange juice
½ tsp Dijon mustard
¼ tsp fine sea salt
A few good grinds black pepper
2 ounces fresh goat cheese
Microgreens to garnish, optional
Directions:
Trim and peel the beets. Cut beets and onion on the julienne blade of a mandoline slicer, or grate them on a box grater if you don’t have a mandoline.
In a small, dry frying pan, toast the walnuts over medium heat for a few minutes, tossing occasionally, until fragrant and lightly browned in spots.
Place beets, onion, walnuts, and orange zest in a medium mixing bowl. Add the oil, vinegar, orange juice, mustard, salt, and pepper, and toss to combine.
Plate salad in a large serving bowl or individual bowls and top with crumbled goat cheese and microgreens.
Roasted Baby Carrots
Adapted from Delish (www.delish.com)
Total time ~ 35 minutes Serves 4
These baby carrots are super simple to roast and a great side dish to most proteins!
Ingredients:
¼ cup balsamic vinegar
¼ cup EVOO
2 Tbs maple syrup
½ tsp crushed red pepper flakes
1 ½ lb baby carrots
Kosher salt
Freshly ground black pepper
Freshly chopped parsley, for serving
Directions:
Preheat oven to 400°. In a large bowl, combine vinegar, oil, syrup, and red pepper flakes. Add carrots, season with salt and pepper and toss to coat. Place carrots on a large baking sheet, being to sure not to overcrowd.
Roast until carrots are fork-tender and slightly charred, 30 minutes.
Garnish with parsley to serve.
Roasted Carrot Hummus
Adapted from The Food Network (www.foodnetwork.com)
Serves 6
Freezer Friendly
Dipping veggies in other veggies! Doesn’t get better than that! Make this and freeze it for later!
Ingredients:
8 ounces carrots, cut into 1-inch pieces
3 cloves garlic, peeled and left whole
2 Tbs plus ½ cup EVOO
Kosher salt
One 15-ounce can chickpeas, drained and rinsed
2 Tbs lemon juice
1/8 tsp cayenne pepper
Root vegetable chips, for dipping
Directions:
Preheat the oven to 425 degrees F.
On a small rimmed baking sheet, toss together the carrots, garlic, 2 tablespoons olive oil and 1/2 teaspoon salt. Cover with aluminum foil and roast until the carrots and garlic are both tender and soft, about 15 minutes. Remove from the oven and cool to room temperature.
Place the carrots, garlic and chickpeas in a food processor. Pulse to combine and break apart slightly. Add the lemon juice, 1/2 cup olive oil, cayenne and 1/4 teaspoon salt. Puree until smooth and an even pale orange.
Sautéed Broccoli Greens
Adapted from Primal Palate (www.primalpalate.com)
Serves 2
Yes! Eat those broccoli greens! They are easy to sauté or add into another dish!
Ingredients:
2-4 cups Broccoli Greens
¼ cup green onion, chopped
5 springs fresh rosemary, minced
2 cloves garlic, minced
2 Tbs bacon grease (or fat of choice)
1 tsp salt and pepper, to taste
Directions:
Wash broccoli greens and remove stems (including the primary vein bisecting the leaves).
Tear broccoli leaves into small pieces, chop green onion, mince garlic and rosemary.
Heat the bacon grease in a large soup pot or french oven over medium high heat.
Saute green onion and garlic for 2 minutes, then add the broccoli greens and rosemary. Saute for 10-15 minutes, stirring often – it will be finished when the garlic and onions soften and the broccoli greens are wilted.
Broccoli Greens Dip
Adapted from our Farmers Kitchen
This is one of Farmer Corinna’s go to recipes for her broccoli greens, she swears by it!
Ingredients:
1 8 oz package fat free cream cheese
1 16 oz package fat free sour cream
½ cup grated parmesan cheese
2 Tbs Ranch seasoning
2 ½ cups finely chopped broccoli leaves
1 green onion stalk, minced
2 cloves garlic
Directions:
Mix cream cheese and sour cream in a small pot on low-med heat until well blended and smooth. Remove from heat and add 1⁄2 cup parmesan cheese and Ranch seasoning stirring until well blended. Finely chop your Broccoli leaves, the smaller the better
Add the remaining ingredients to your cheese sauce, stir and serve, or refrigerate for an hour and serve chilled.
Easy Pickled Green Onions
Adapted from The Easy Homestead (www.theeasyhomestead.com)
Looking for a way to preserve those tasty gems just a little longer? Pickle them! It’s super easy and you can enjoy them on salads, burgers and other veggies!
Ingredients:
3 cups filtered water
1 ½ cups white distilled vinegar
1 ½ Tbs of Salt
20-30 green onions (4-5 bunches)
½ tsp whole black peppercorns
½ tsp mustard seeds
½ – 1 tsp dried dill (depending on taste)
½ tsp crushed red pepper (optional)
Directions:
Heat water, vinegar, and salt in medium saucepan over med-low heat until all salt is dissolved.
Set aside and let cool until ready to use. While water, vinegar, and salt are coming to a boil cut the ends off of the green onions.
Cut the tops off of the green onions right where it starts to look like a ‘fork in the road.’ Save these for fresh chives.
Add peppercorns, mustard seeds, dried dill, and crushed red pepper (optional) to a 1 quart mason jar.
Stuff the cut onions into the jar. Pack them in tight.
Pour liquid from the saucepan over the onions. Leave about 1 inch headspace. Liquid should still be a little hot/warm. You want this so it “cooks” the onions a bit.
Let cool to room temperature. Put a lid on it and stick it in the fridge.
Should be ready in 12 hours but the best flavor is 3-7 days!
NOTES
* If you like it hot add crushed red pepper.
* If you like to taste a lot of dill then add 1 teaspoon, little dill ½ teaspoon.
* Stays good for up to one month in the fridge.
Cilantro Green Onion Sauce
Adapted from our Her Heart and Table (www.herheartandtable.com)
Time ~ 5 minutes Makes 2 cups
Make this magical sauce to use as a dip, spread, marinade or dressing. Thin as needed depending on what you use it for!
Ingredients:
1 cup cilantro packed
1 cup green onions
2 cloves garlic
3 Tbs fresh lemon juice
½ cup EVOO
½ cup water
salt and pepper to taste
Directions:
Add all ingredients to a blender or food processor and pulse until smooth.
Serve as dip, sauce or spread – or add oil/water to thin it to make a marinade.
Cilantro Lime Dressing
Adapted from Fifteen Spatulas (www.fifteenspatulas.com)
Time ~ 10 minutes Makes 1 ½ cups
This is amazing on top of a taco salad, or even just on top of plain grilled chicken!
Ingredients:
1 bunch cilantro (see notes)
1 jalapeno
3 large cloves garlic minced (2 Tbs minced)
3 Tbs fresh lime juice
½ cup greek yogurt
½ tsp salt
¼ tsp black pepper
6 Tbs EVOO
Directions:
If the ends of the cilantro stems look brown or old, trim them off, keeping as much of the stem as possible. The stems blend well and have great flavor.
Cut the stem off the jalapeno, and remove the seeds and ribs from the jalapeno if you desire. Keeping those in will make the dressing more spicy, and they will blend up just fine.
Place the cilantro, jalapeno, minced garlic, lime juice, yogurt, salt, and pepper into a blender, and blend until smooth, about 30 seconds.
Add the olive oil, and blend for a few seconds, until just incorporated.
Taste and make any necessary seasoning adjustments. Then enjoy!
Store leftovers in the refrigerator for up to 5 days.
Notes:
Assuming you are washing the cilantro, make sure to dry it very thoroughly. Otherwise the leftover water will significantly thin out the dressing and make it less flavorful. The cilantro bunches I use are about 2 cups packed, and weigh 3.5 ounces with the stems.
Blueberry Raspberry Muffins
Adapted from Natasha’s Kitchen (www.natashaskitchen.com)
Time ~ 30 minutes
Makes 12 muffins
Sub in or out any berries in this simple recipe, feel free to freeze those muffins to enjoy months from now!
Ingredients:
2 large eggs room temperature
1 cup granulated sugar
1 cup Greek yogurt (or sour cream)
½ cup oil
1 tsp vanilla extract
¼ tsp sea salt
2 cups all-purpose flour
2 tsp baking powder
½ cup strawberries hulled and diced
½ cup raspberries
½ cup blueberries
Directions:
Line a 12-count muffin tin with cupcake liners and preheat oven to 400˚F. In a large mixing bowl, using an electric mixer, beat 2 eggs with 1 cup granulated sugar on high speed 5 minutes, or until thick and light in color.
Add 1 cup Greek yogurt, 1/2 cup oil, 1 tsp vanilla. Set mixer to low speed and mix just until combined.
In a small bowl, add 2 cups flour, 2 tsp baking powder and 1/4 tsp salt and whisk to combine. Using a hand held whisk, add flour mixture into the batter 1/3 at a time, stirring to incorporate with each addition. DO NOT OVERMIX or muffins will be dense.
Use a spatula to fold in 1 1/2 cups mixed berries, folding just until combined.
Divide batter into prepared muffin tip, filling to the top or until all of the batter is used up. Bake in the center of the oven at 400˚F for 20-22 minutes or until tops are golden and a toothpick inserted into the center come out clean.
Transfer muffins to a wire rack to cool. Serve warm or at room temperature.
Cherry Berry Crisp
Adapted from Food (www.food.com)
Time ~ 40 minutes Serves 8
Use any combination of berries this in this favorite crisp!
Ingredients:
Crisp:
2 cups blueberries
2 cups raspberries
2 cups cherries
2 Tbs brown sugar
1 Tbs all purpose flour
1 Tbs fresh lemon juice
Topping:
2/3 cup all purpose flour
½ cup packed brown sugar
½ cup oats
¾ tsp ground cinnamon
4 ½ Tbs chilled butter, cut into small pieces
Directions:
Preheat oven to 375°.
Combine first 6 ingredients in a medium bowl; spoon into an 11 x 7-inch baking dish.
Lightly spoon flour into a dry measuring cup, and level with a knife. flour, brown sugar, oats, and cinnamon, and cut in the butter with a pastry blender or in food processor until the mixture resembles coarse meal. Sprinkle over the blueberry mixture.
Bake for 30 minutes or until bubbly. Top each serving with 1/4 cup frozen yogurt.
Blueberry Balsamic Vinegar
Adapted from The Food Network (www.foodnetwork.com)
Time ~ 3 days Makes 5 ½ cups
Have this on hand as a topping for salads all summer!
Ingredients:
4 cups frozen, thawed or fresh blueberries
1 quart balsamic vinegar
¼ cup sugar
Lime peel cut in strips from 1 lime (green part only)
1 (3-inch) cinnamon stick
Directions:
In a large non-reactive saucepan, crush blueberries with a potato masher or back of a heavy spoon. Add vinegar, sugar, lime and cinnamon and bring to a boil. Reduce heat and simmer, covered, for 20 minutes. Cool slightly and pour into a large bowl. Cover and refrigerate for 2 days to allow flavors to blend.
Place a wire mesh strainer over a large bowl. In batches, ladle blueberry mixture into strainer, pressing out as much liquid as possible. Discard solids.
Pour vinegar into clean glass bottles or jars, and refrigerate, tightly covered, indefinitely. Use in salad dressings or drizzled over chicken or beef.