
Week 3 CSA Newsletter 2019
July 7-13, 2019 | “A” Week
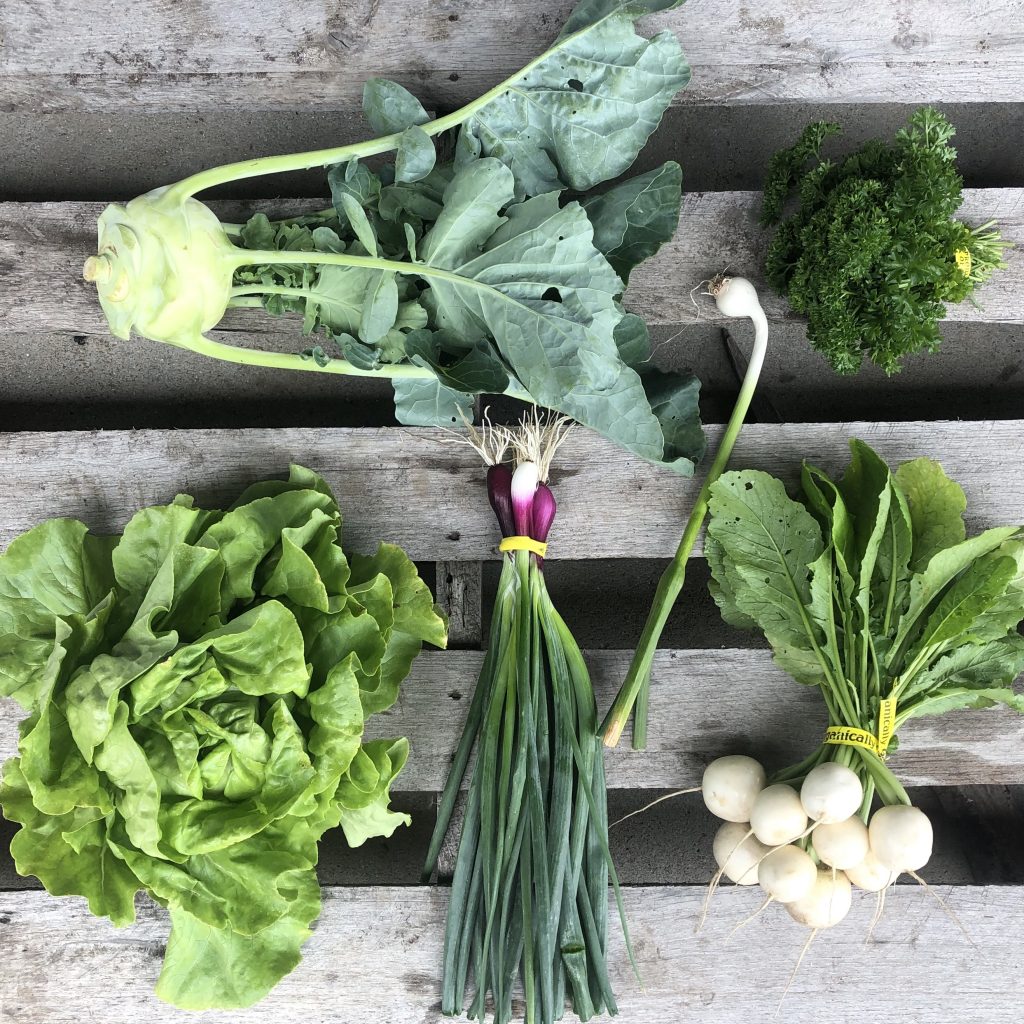
IN YOUR VEGGIE BOX THIS WEEK:
HEAD LETTUCE ~ Put your head lettuce in a Debbie Meyer Green bag right away and leave it in the fridge. Use within a week. Lettuce falls into the category of “danger zone veggies” — ie they are in danger of rotting more quickly than other items. So use your lettuce early on in the week for maximum efficiency. When ready to eat, wash, spin dry in a salad spinner.
FRESH GARLIC ~ This week, you will get 1 fresh mini garlic head. Fresh garlic needs to be refrigerated and used quickly (within a week) because it is not cured. Put it in a plastic baggie. You can use it wherever you’d use normal cured garlic. I know it’s small — if you recall, we lost most of our garlic crop this winter, so we are sharing whatever we were able to salvage with all of you.
KOHLRABI ~ Store this bulb in a plastic bag in the crisper. Cut the skin off the bulb, then slice or shred. Use in place of cabbage in a slaw. Add to a salad. Roast it. Or try it raw with peanut butter — Farmer Kurt’s favorite snack.
HAKUREI SNACKING TURNIPS ~ Cut the tops off these guys and save them in a separate bag. You can add the greens to the famous “frozen green cubes” recipe or add them to soups and stews. The white roots can go in a plastic bag in the fridge and store for 2-3 weeks. They are delicious raw. You can grate them, roast them, grill them, or pickle them.
PURPLE BUNCHING ONIONS ~ Also called “green onions” or “scallions” this variety has a beautiful purple skin. Store these like a flower in a Mason jar of water in your fridge. Cover the green tops with a baggie. They will store this way for WEEKS. The tops can be chopped off and frozen in 1-inch segments in a Freezer bag! Add them to chilis, chicken noodle soup, salad, Mexican dishes.
PARSLEY ~ This will be on the Extras table, so you’ll be able to bag it yourself. Parsley should be stored in your fridge in a plastic bag or as a flower in a Mason Jar (See purple bunching onions above), and it will last a couple weeks. If you can’t get to all of your parsley, try dehydrating it into parsley flakes. Or make chimichurri sauce with it.
Thanks for your continued patience. We realize the box contents are still a bit light as we continue to recover from the after-effects of the wet spring season, which prevented us from planting our transplants on time. We’re still behind schedule, but we hope to make up for it later!
FRUIT SHARE
SWEET CHERRIES ~ (Fruit share) Are you getting sick of cherries, yet? This week, as the cherry crop becomes more abundant, you’ll receive a mix of cherries. Some will be red. Others will be Rainier — a yellow-pinkish-red blush color. Be sure to pit these before eating. If you’re starting to feel overwhelmed by cherries, you can pit them and freeze them on a cookie sheet to enjoy later. Don’t let them go to waste! They are one of the most expensive parts of the fruit share! These cherries come from Quarry Hill Orchard in Berlin Heights, courtesy of Farmer Ben. Don’t worry… peaches and blueberries are coming soon!
CHEESE SHARE: Black Swamp Gouda and Charloe (Canal Junction Cheese); Tomato Pesto Cheese Curds (Turkeyfoot Creek Creamery)
MADDIE & BELLA COFFEE: Nicaragua Cafe Diego
EGG SHARES ARE DOUBLING UP THIS WEEK
The chickens don’t stop laying!
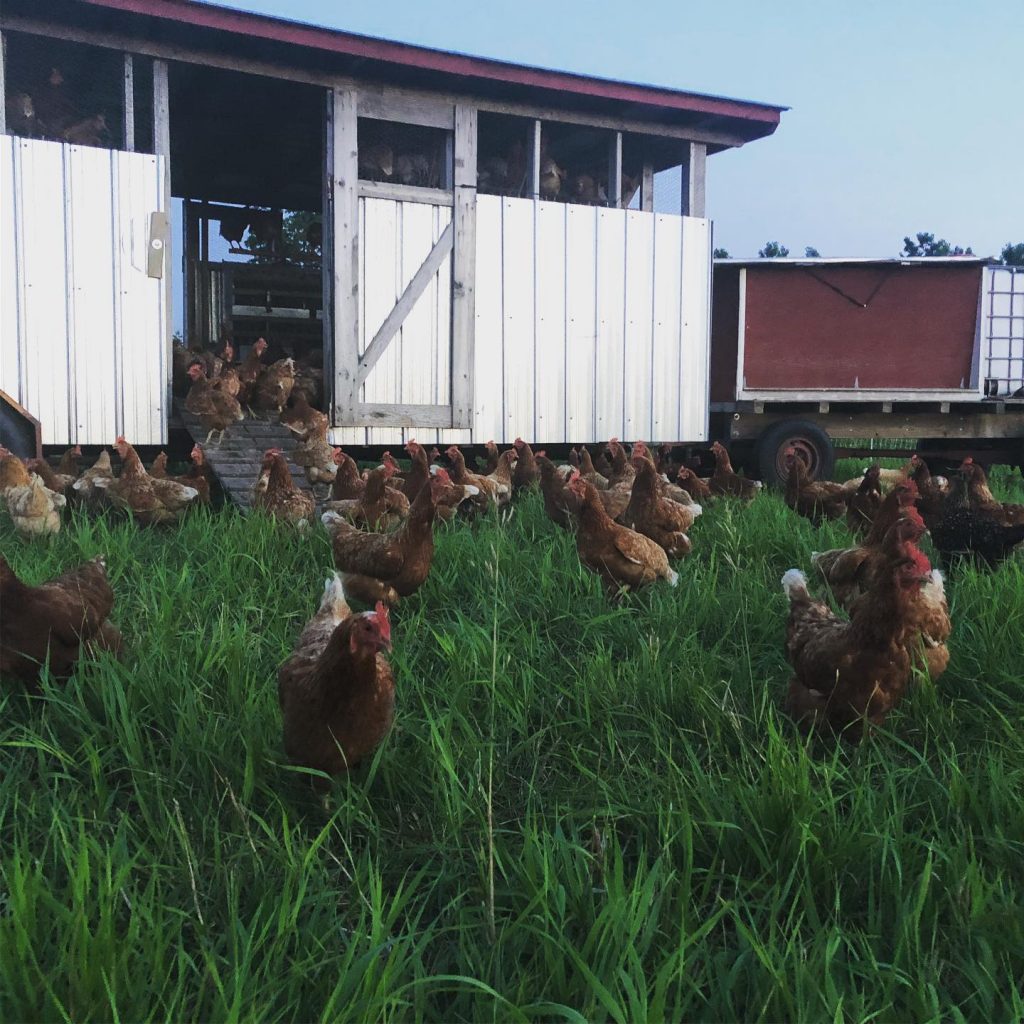
Weber Ranch hens eating on fresh grass. These ladies were working hard during the weeks we were “off” this June. So we’re backlogged with eggs.
Remember how we started our CSA a couple weeks behind schedule?
Well, Weber Ranch’s chickens (who provide our egg share) were still laying eggs. And as a result, we’ve got a back-log of eggs that have piled up. Tony and Michelle Weber have asked us to “double up” on eggs this week, so we can get back on the chicken’s schedule and clear our cooler space.
This will also help later in the summer when the chickens begin to “molt” (lose their feathers) and decrease their egg production. Tony and Michelle Weber want to make sure you get the eggs you paid for, so this is an insurance measure.
Here’s how it will work. If you are a weekly egg share, you will get TWO dozen eggs on week 3. If you are an “A” week egg share, you will get 2 dozen eggs as well. And on Week 4, our “B” week egg customers will get their double dozen eggs. (Weekly eggs will just get their regular 1 dozen on week 4).
This will bump up our egg share by a week. That means that A share members will get their FINAL egg share on week 15. B share members will get THEIR final egg share on week 16. And full weekly shares will get THEIR final egg share on week 17.
And if this is all mumbo-jumbo to you, don’t worry. We’ll keep track of it all on our checklist.
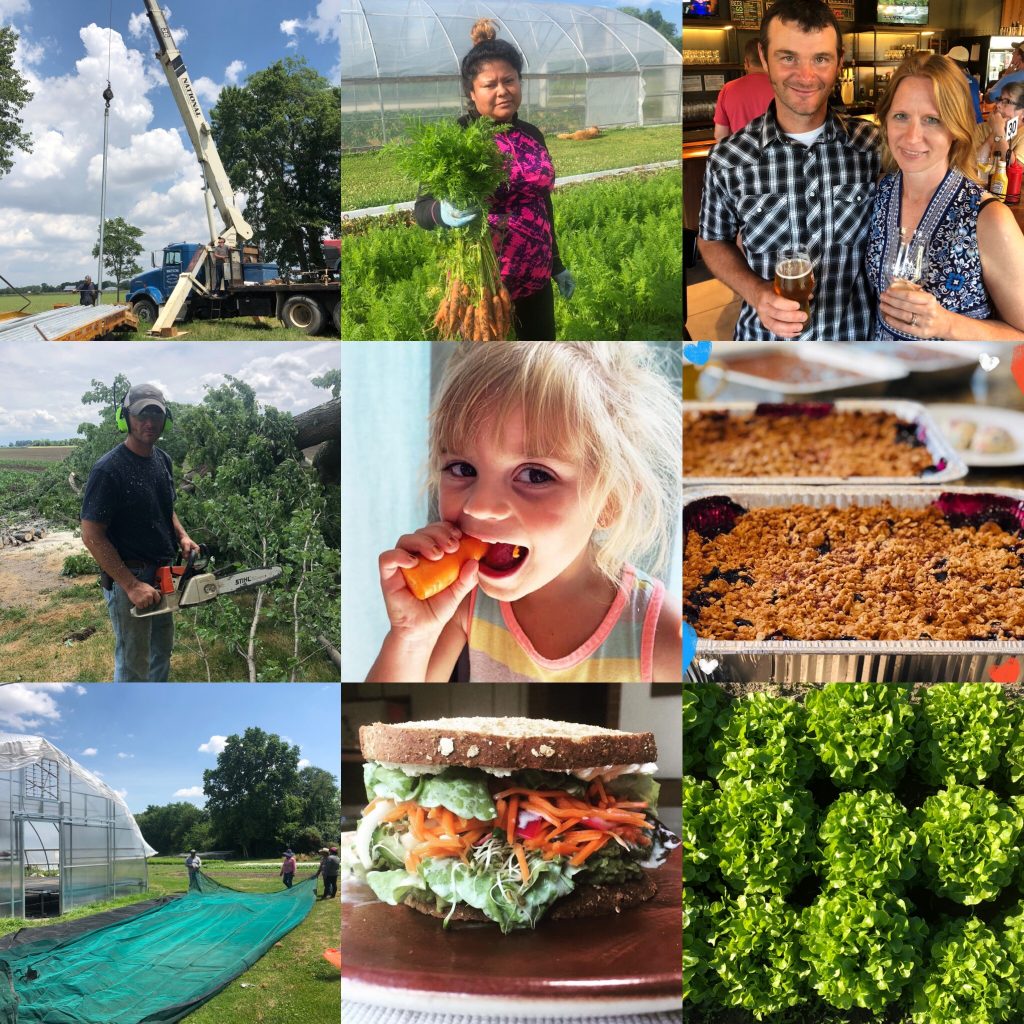
Week 3 images from the farm
WEEK 3 ANNOUNCEMENTS
- Watch our weekly Live Unboxing video this Tuesday around 8 PM inside the private Facebook group. Cadie Jardin, our CSA coach and dietitian, will show you what’s in the box, share storage tips and ideas for how to use your product. You can find the Facebook group at this link.Only CSA members or paying members of the Academy can access this group.
- Mozzarella Cheese Class is NEXT Saturday, July 13, at the farm. You’ll be getting an email this week if you signed up for the class with details of what to bring.
- Save the date! We’ve scheduled our Field to Table dinner for Sunday, September 8, starting at 6 PM. 100 tickets available. 4 of our local chefs partnering together for a fundraiser for local food banks. We’ll have details and ticket information in NEXT week’s email.
FARMER KURT’S FIELD NOTES ~ WEEK 3

Here I am chainsawing the tree that fell after the storm.
Howdy folks! It’s hotter and muggier then heck out here! Just like that we go from flooding fields and non-stop rain to topsoil so dry we had some cracks in the beds! I was getting a little nervous last week sitting out here like a lame duck without a working well. But God sent us a couple of good rain showers that quenched the fields and bought us some time.
One of the T-storms that blew through was particularly strong. Corinna was home when it happened. She said it felt like 60 mph winds for about 30 seconds. Things were blowing around outside. And we even had a big maple tree crack in half. Lucky for us, it fell into the sweet corn field (and not into Bartolo’s house). I spent the better part of the next day hustling my chainsaw to clear the driveway. Jed and Josiah helped too, although they really wanted me to keep it as a playhouse area to climb on. We also had a little bit of hail damage to our onions, but nothing too bad.
The big story at the farm continues to be the Well Installation. If you missed last week’s newsletter, I talked all about how we purchased a $30,000 new well pump for my parent’s farm. This past Friday, the contractors got it in. Corinna was there (lucky lady) to witness the big moment, and thankfully she caught it on film (which you can see below). In fact, she happened to be there for the best part — putting in the submersible pump. After that, they screwed on each new section of 20 foot pipe length and lowered it deeper into the ground with the crane.
The next phase of the install is to get the generator completed and on site and then wire it up to the variable frequency drive. My dad has been working like crazy all week to build a new chassis to hold the larger engine and generator head. We still have a few more small details to work out but we should be ready to fire it up by the end of next week. I’ll be sure to share the big moment when we connect the machine to the well and see if it works.
So let’s talk sweet corn. Some of you have been asking whether the sweet corn was affected by all the spring floods. My parents were able to get the first planting in before the major rains began, so we actually have a crop that’s “knee-high by the Fourth of July” right now. It’s “tasseling” in fact! (That means it’s getting ready to pollinate). The second planting is a little behind schedule. But the short answer is that we should still have plenty of sweet corn for all of you, it’s just going to be a little later than normal.
Planting continues. This week I seeded more carrots, brussels sprouts, cabbage, late tomatoes, and even more lettuce. Trying to grow lettuce in the hot temperatures is always a gamble. I’ve been doing my best to keep them watered a lot to see if that helps. But usually hot temperatures will make the lettuce taste bitter. The summer crops are loving the heat though — tomatoes, eggplant, peppers — they’re growing fast. I also got my first tomato stakes in the field. We’ll start “tying” the tomatoes to the stakes this week. We covered the greenhouses with shade cloth this week too. And I finally installed my house window air conditioner. (That’s when I know summer is really here.)

A step by step look at the new well pump going in.
Our small patch of raspberries, currants, and gooseberries are bearing fruit right now. Jed went out Thursday and picked an entire big bowl of raspberries to eat for himself. I told him later, “Hey that’s $60 in berry sales, boy!” But I guess that’s why I planted them. He just smiled and said “Daddy raspberry ice cream!”
I’ve noticed my anxiety level is a lot lower this season than in years past. A big part of that has to do with some changes we made to our operation this year. In business, we talk a lot about “opportunity cost.” And what do you need to STOP doing (even if it’s making you money) so you can gain greater value somewhere else. This year, we’ve made several big decisions in the name of “opportunity cost.”
For example, buying a box truck has saved me lots of time having to drive out to Fremont to borrow a loaner vehicle every time I want to take a big load somewhere. We also started outsourcing our fruit share to Quarry Hill, which has opened up about 10 hours a week for Corinna AND built a better fruit product.
But the biggest decision of all involved cutting my “work-share” staff last year by 50% and moving the CSA harvest to the morning crew instead. That one decision has given me my Monday and Wednesday evenings back. For the last 2 weeks, the evening packing crew has finished the “box packing” process around 6:30 PM (instead of 9:30 PM). That has been priceless.
If we can dodge the storms, I’m hoping to take some family time this weekend and head to White Star Park and swim in the Quarry — our local watering hole. I’ve got a major farmer tan I’ve got to work on.
Until next week
~Farmer Kurt
WORDS OF ADVICE FOR CSA ROOKIES:
So CSA rookie, it’s week 3. How ya doin’ so far?
Let me guess… Have any of these thoughts run through your head?
- Pac choi? What the heck is that?
- I hate radishes.
- Wait, you can radish tops?… Why?
- So much lettuce! How many salads can a girl eat?
- Zucchini! Thank God. Something I recognize.
- I think my herb is dying.
- You want me to do WHAT with the carrot tops?…
I’m chuckling as I write this because I remember thinking EVERY ONE of these sentences. I’ve come a LONG way since we began the CSA farm in 2018.
I’m here to encourage you. You are not alone!
If you’re feeling overwhelmed, that’s normal. The first year or two of CSA is a huge learning curve. You often feel behind the eight ball, swimming in a sea of veggies you don’t recognize. Your brain starts to hurt as your enthusiasm for “trying new things” begins to battle with your desire for routine dishes of the past.
It’s also common to want to compare yourself to the fancy pictures you see flying around on the Facebook group and think: “Grilled carrots with honey-balsamic glaze?… Shoot. I ‘m lucky if I can cut ’em up and serve them with some Ranch dressing.”
Oh yeah. We’ve all been there. (Heck, I’m still there some weeks).
So today I want to give you permission to take a DEEP breath. (Go ahead. Breathe). Then tell yourself how awesome you are for taking STEP ONE in this journey, and how you aren’t supposed to be awesome at it right away. Give yourself permission to baby step this.
Tell yourself it’s okay if you don’t like radishes… yet.
It’s okay if you composted the carrot tops.
Really.
At the end of the year, I PROMISE, you’ll look back and discover that you DID have a few “a-ha” moments that grew you as a foodie. And the next year, there will be a few more.
Remember CSA is a marathon, not a sprint. Set realistic expectations for the first leg of your race.
And maybe try making carrot top pesto just ONCE (and then compost those tops the rest of the season).
A few years ago, I did some research of my long-time members and asked them what advice they would give to new folks starting out. I heard a lot of the same things over and over again. I compiled a lot of the advice into the Roadmap to CSA Success mini-course (which you can find inside the Academy). (FYI: CSA members get free access to the Academy).
But for today’s article I decided to write a Cliffs Notes version of the most important advice I’d share from that training. Here are my Top 10 Tips for CSA Rookies.
1. Take the tops off your carrots when you get home (or you’ll be sorry).
2. Buy a 20 pack of Debbie Meyer Green bags on Amazon for $10 and use them to store your greens.
3. Make it a goal to get more comfortable with eating 3 new veggies the first year. Just three.
4. Plan your meals around this principle: Eat the most perishable items first.
5. Watch the unboxing videos each week on Tuesdays. Cadie walks you through how to store each item and gives suggestions for what to make with it.
6. Use the Facebook group for inspiration. Your fellow CSA members will share pictures of what they’ve tried. I get so many ideas from this group! Even if you don’t end up doing them this year, these ideas start to file away in your brain, and you eventually learn what cooking techniques you can play with.
7. Learn how to make frozen green cubes out of all those greens you THINK you won’t like. (Hello kale, chard, beet tops, carrot tops, collards, broccoli greens). Trust me. This is a game-changer.
8. Learn how to freeze your veggies. Almost everything can be frozen (except lettuce and possibly cucumbers). And when you start to feel like you’re drowning in veggies, freeze them before you have to compost. Download the A to Z storage guide from the Academy and keep it handy. It will tell you how to store and freeze EVERYTHING.
9. Keep meals simple. Don’t feel pressured to get all fancy. Sometimes the best way to eat something is super easy — raw, sauteed in olive oil, a salad, roasted, or grilled.
10. Invest in a salad spinner, ice cube trays, and some Ziploc baggies. In fact, I recommend you watch the 2 short videos all about the Top Kitchen Tools that CSA Masters Use.
Want the FULL list? I’ve got a 3 page PDF of suggestions given to me in a survey of my CSA masters. You can grab the FULL list of Master Advice for CSA Rookies here.
WORKSHOP: PESTO WITH A PESTLE
Sat, July 27, 2-4 PM
 Join instructor Diane Rodgers in learning how to make your own pesto using a mortar and pestle. Diane swears that the taste difference between a pestle method and a food processor is significant. Unlike years past this includes ALL the ingredients waiting for you at the farm to make the pesto — olive oil, pine nuts, basil, garlic, salt, cheese. You also get to take home your pesto that you made and enjoy some tasting and snacks. All you need to do is bring your own mortar and pestle.
There are two pricing options:
- Workshop plus BYO pestle: cost is $45.
- Workshop plus Diane’s recommended mortar & pestle: YOU MUST REGISTER A WEEK BEFORE THE CLASS TO GET THE MORTAR/PESTLE.
Please pre-pay in our online store at the links provided above. NOTE: You must provide a cutting board and knife. Details will be sent home before the workshop to remind you of what equipment to bring.
WEEK 3 RECIPES
Members: You can download these recipes separately as a PDF inside the Membership Academy. Look under the RECIPES course section, Week 3.
Glazed Hakurei Turnips
Adapted from Bon Appetit (www.bonappetit.com), Serves 10
Try this simple recipe to enjoy those turnips and their greens!
Ingredients:
3 bunches baby Hakurei turnips, baby turnips, or red radishes (about 2 pounds), trimmed, greens reserved
¼ cup (1/2 stick) unsalted butter
3 Tbs sugar
Kosher salt
Directions:
Place turnips in a large skillet; add water to cover turnips halfway. Add butter, sugar, and a large pinch of salt; bring to a boil.
Cook, stirring occasionally, until liquid is syrupy and turnips are tender, about 15 minutes. (If turnips are tender before liquid has reduced, use a slotted spoon to transfer turnips to a plate and reduce liquid until syrupy. Return turnips to pan and stir to coat well.)
Add turnip greens to skillet and cook over medium heat, stirring occasionally, until just wilted, 2–3 minutes. Season with salt.
Miso Roasted Turnips
Adapted from Foolproof Living (www.foolproofliving.com)
Total time ~ 20 minutes, Serves 4
This miso adds such a great flavor!
Ingredients:
2 pounds of Japanese turnips, rinsed and cut in half – green parts reserved
3 Tbs white miso paste, divided
3 Tbs olive oil, divided
coarse sea salt
freshly ground black pepper
Directions:
Pre-heat the oven to 425 degrees. Line a baking sheet with parchment paper. Set aside.
Whisk together the 2 tablespoons of miso paste and 2 tablespoons of olive oil in a bowl.
Spread the turnips on the prepared baking sheet. Drizzle it with the miso-olive oil mixture. Give it a toss to make sure that all turnips are coated with the mixture. Place in the oven and bake for 12-15 minutes making sure to rotate the turnips halfway through the baking process. When they come out of the oven, let them cool. Sprinkle them with a big pinch of black pepper. Taste for seasoning and add in some salt if necessary.
Meanwhile, rinse the green parts and roughly chop them up. Heat a tablespoon of olive oil in a large pan. Sauté the chopped greens until they are lightly wilted, 2-3 minutes. Stir in the rest of the miso paste and make sure that the green leafs are coated with the paste. Add in ¼ teaspoon freshly ground black pepper. Taste for seasoning and add in if necessary.
Transfer the warm greens in a large salad bowl. Spread the roasted turnips on top of the greens.
Serve immediately.
Kohlrabi Slaw
Adapted from Bon Appetit (www.bonappetit.com)
Total time ~ 25 minutes Serves 4-6
Kohlrabi slaw is a favorite in our CSA group! It’s such a great way to enjoy this crispy veggie! Make this ahead and let the flavors marinate overnight.
Ingredients:
6 cups kohlrabi -cut into matchsticks or grated in a food processor -about three x 4 inch bulbs (or you could substitute sliced fennel, apple, jicama, cucumber, or cabbage for part of the kohlrabi for more diversity)
½ cup chopped cilantro (one small bunch)
half of a jalapeno –minced
¼ cup chopped scallion
orange zest from one orange, and juice
lime zest from one lime, and juice
Dressing:
¼ cup olive oil
¼ cup fresh orange juice (juice form one orange)
1/8 cup lime juice plus 1 Tbs (juice from one large lime), more to taste
¼ cup honey
½ tsp kosher salt
1 Tbs rice wine vinegar
Directions:
Trim and peel kohlrabi. (I normally have to peel twice to get thru the thick skin). Cut off two ends. Cut in half from top to bottom. Thinly slice, rotate and slice again, making 1/4 inch matchsticks.
Place in large bowl with chopped cilantro, scallions, finely chopped jalapeño ( 1/2), lime zest and orange zest.
Whisk dressing together in a small bowl. Toss with salad. Refrigerate until serving. Garnish with zest and cilantro. This tastes good the next day too.
Kohlrabi Carrot Fritters with Avocado Cream Sauce
Adapted from A Couple Cooks (www.acouplecooks.com), Makes 8 fritters
Fritters are a great way to use a large variety of veggies from your box!
Ingredients:
Fritters:
2 kohlrabi
1 carrot
1 egg
¼ tsp kosher salt
¼ tsp cayenne
½ cup grapeseed or vegetable oil (enough for ¼-inch depth in a large skillet)
For the avocado cream
½ avocado
¼ cup plain yogurt
½ lemon
¼ tsp kosher salt
Green onions (for garnish)
Directions:
Cut the leaves off the kohlrabi and peel the bulb. Peel 1 carrot. Shred the vegetables in a food processor, or by hand using a grater. Squeeze the shredded vegetables in a tea cloth (or with your hands) to remove moisture, then add to a medium bowl with the egg, kosher salt, and cayenne. Mix to combine.
Place the oil in a large skillet (enough for 1/4-inch depth). Heat the oil over medium high heat, then place small patties of the fritter mixture into the oil. Fry on one side until browned, then fry on the other side. Remove and place on a plate lined with a paper towel to drain excess oil.
For the dipping sauce: Remove the avocado pit and scoop out the flesh with a spoon. In a small bowl, mix the avocado, plain yogurt, lemon juice, and kosher salt to make the avocado cream (or blend the ingredients together in a food processor).
To serve, slice the green onions. Serve fritters with avocado cream and green onions. Note: These fritters are best eaten warm the day of making; they don’t save well. Like anything made with avocado, the avocado cream sauce will become brown after exposure to air. Make sure to cover the surface with plastic wrap when storing.
Zucchini Noodle Salad with Parsley Pistachio Pesto
Adapted from The Kitchn (www.thekitchn.com) Serves 4-6
Still have some summer squash from last week? Try making this amazing pesto to pair with it. You could also just make this pesto and freeze for later use.
Ingredients:
4 medium zucchini (about 1 1/2 pounds)
2 cups Italian parsley, roughly chopped
2 cups arugula, roughly chopped
1/3 cup shelled pistachios, plus more for garnish
1 large clove garlic, smashed
½ cup grated Parmesan, plus more for garnish
2 Tbs sherry vinegar (see Recipe Notes)
1 Tbs freshly squeezed lemon juice, plus more to taste
½ cup EVOO
Kosher salt and pepper, to taste
Directions:
Spiralize the zucchini using a spiralizer, mandoline, or vegetable peeler. Pat the zucchini noodles very dry with paper towels or a kitchen towel and transfer to a large bowl.
Combine the parsley, arugula, pistachios, and garlic in the bowl of a food processor or blender and process until coarsely chopped. Add the Parmesan, vinegar, and lemon juice, and pulse until combined. With the machine running, slowly add the olive oil until the pesto is thick and smooth. Taste and add salt, pepper, and additional lemon juice as needed.
Add the pesto to the bowl with the zucchini noodles and toss until well combined. Taste and adjust seasoning as needed. Garnish with chopped pistachios and grated Parmesan. Serve immediately
Scallion Vinaigrette
Adapted from The Domesticated Wolf (www.thedomesticatedwolf.com)
Homemade dressings are the best! Especially when you have that great lettuce to pair them with!
Ingredients:
½ cup EVOO
½ cup apple cider vinegar
1 cup sliced scallions
2 Tbs grainy mustard (or any mustard of your choosing)
½ tsp kosher salt
¼ tsp freshly cracked black pepper
1 tsp honey
red pepper flakes to taste
Directions:
In a mason jar, combine all ingredients and shake very well to combine, or blend for a creamier texture
Refrigerate or use immediately, will last about 1 week
Garlic and Parsley New Potatoes
Adapted from Genius Kitchen (www.geniuskitchen.com) Serves 4
Use your green garlic for an amazing side dish this week!
Ingredients:
12 small red potatoes
4 garlic cloves, minced
2 Tbs fresh parsley, chopped
3 tsp EVOO, divided
salt and pepper
Directions:
Scrub the potatoes well. Pare a 3/4″ strip around the middle of each potato (this is just to give you a little contrast in color).
Place potatoes in a saucepan, cover with water and bring to a boil. Simmer covered for about 20 minutes or until tender.
Drain potatoes and place them in a bowl add two teaspoons of oil& toss.
In a non stick fry pan add the remaining oil over medium heat.
Add garlic, cook approximately 1 minute.
Add parsley, salt& pepper, mix well.
Add potatoes, reduce heat to low and cook stirring constantly for 1 or 2 minutes. Serve.
Parsley Garlic Butter
Adapted from Epicurious (www.epicurious.com)
Makes ~1/2 cup | Freezer Friendly
Not sure what to do with those herbs? Make an herb butter! This also freezes well.
Ingredients:
1 stick (1/2 cup) unsalted butter, softened
½ cup finely chopped fresh flat-leaf parsley
2 Tbs minced shallot
2 Tbs fresh lemon juice
½ tsp minced garlic
1 tsp salt
¼ tsp black pepper
Directions:
Purée all ingredients in a food processor until smooth.
Store in an airtight container or freeze for several months.
Fresh Cherry Quick Bread
Adapted from King Arthur Flour (www.kingarthurflour.com) Freezer Friendly
Ingredients:
½ cup butter, softened
¾ cup granulated sugar
2 large eggs, beaten
1 Tbs vanilla extract
1 ¾ cups unbleached all-purpose flour
1 ½ tsp ground coriander or ground cardamom
½ tsp salt
1 Tbs baking powder
1 cup fresh cherries, pitted; or diced fresh plum
Directions:
Preheat the oven to 350°F. Grease a 9″ x 5″ loaf pan.
Beat the butter and sugar together, then beat in the eggs and extract.
Sift the dry ingredients together and add to the wet ingredients. Stir in the cherries. Spoon the batter into the prepared pan.
Bake the bread for 45 to 55 minutes. Insert a skewer or cake tester into the center; it will come out clean when the bread is done.
Cool the loaf for 10 minutes in the pan, then turn it out on a rack to fully cool. Wrap in plastic until ready to serve; store it overnight for best flavor.
Store at room temperature for up to 5 days, or freeze for up to 3 months.
Cherry Vanilla Dark Chocolate Overnight Oats
Adapted from Recipe Runner (www.reciperunner.com)
Makes 2 servings
Love these for a quick meal or breakfast on the go! Make several and have breakfast ready to go all week! I always just use the chia seeds, so don’t worry if you don’t have the flax seeds!
Ingredients:
½ cup plain Greek yogurt
2/3 cup unsweetened almond milk or milk of choice
2 Tbs maple syrup
1 tsp vanilla extract
1 Tbs chia seeds
1 Tbs flax meal
½ cup rolled oats
Pinch of salt
½ cup pitted, chopped cherries
1 Tbs chopped dark chocolate
Directions:
Whisk together the Greek yogurt, milk, maple syrup and vanilla in a bowl.
Add in the remaining ingredients and stir together until combined.
Divide the mixture evenly into two jars and cover with lids.
Refrigerate overnight. Oats are good for several days.
Roasted Cherry Brownies
Adapted from Pinch of Yum (www.pinchofyum.com) | Freezer Friendly
It’s dessert time! This is a great option if you want to freeze a dessert for later!
Ingredients:
1 cup fresh cherries
Sugar for sprinkling
Ghirardelli Ultimate Fudge brownie mix + oil + egg
Vanilla bean ice cream (for serving)
Directions:
Pit cherries and cut them in half. Sprinkle with sugar and roast at 400 degrees for 10 minutes.
Prepare brownie mix. Remove cherries from the oven and reduce oven temperature according to brownie directions.
Mix cooled cherries into the brownie batter and bake according to brownie directions. Top with ice cream!