Fermented Pickles: I Can’t Believe It’s This Easy

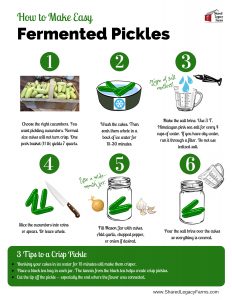
You can download this cheatsheet for fermented pickles in the Membership Academy. Want to join the Academy? See how at the end of this post.
This week, I grabbed my video camera and tripod and headed over to CSA member Brianne Markley’s house to learn how to make fermented pickles.
Now hit the pause button a sec.
These are not the same thing as dill pickles made in a water bath canner. (I make about 4 batches of those every year, because we eat that many dill pickles.)
No, this was something else.
Brianne first introduced me to the world of fermentation last year at a Sauerkraut-making workshop.
Now I’ll be honest. Back then, when I heard the word “fermentation,” I was expecting something complicated with swarmy heat-filled kitchens and strange voodoo magic. But instead, all we did was pack the sauerkraut solution in a jar on the counter and let nature do its magic. A few weeks later I had the best sauerkraut I’d ever tasted.
Brianne is somewhat of a fermentation expert. After experiencing some health issues in her family, she decided to try eating fermented foods. The result: health issues cured. She is now an avid proponent of using fermented foods in your diet. And you’ll always find something bubbling on her countertop.
Fermenting is the “old-school” method of preserving food — before we had water bath canners and refrigerators. Our ancestors learned how to use salt to help foster chemical reactions in food that would increase its shelf-life.
Fermenting usually involves creating a salt solution that is mixed with vegetables. The salt kills off the “bad” bacterias and fosters the growth of the “good” ones.
Good ones?
Yes, there are apparently “good” bacteria. These are the guys that live in your gut and help you digest your food. (When you take probiotics from the store, you’re actually re-introducing these good guys into your system to restore balance to “the force.”)

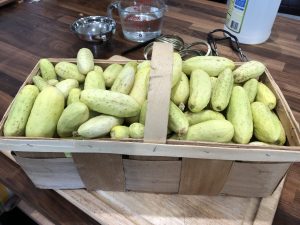
These are pickling cucumbers –a blonde variety. This is a peck basket and it yields about 7 quarts.
Sometimes, people experiencing regular digestive issues simply have an imbalance of good bacteria in their system, which can be cured with a regular dose of probiotics. Simply adding a regular tablespoon per day of fermented food (aka probiotics) can turn things around.
Now probiotics at Rite-Aid are expensive.
So why not make your own probiotics, instead of buying them? Just learn how to make a couple of different fermented foods, and you’ll be on your way.
For pickles, all you need is some sea salt, pickling cucumbers, a few black tea bags (more on that later) and water.
So back to Brianne…
Brianne taught me how to make fermented pickles in about 30 minutes. I still can’t believe it wasn’t more complicated. I kept waiting for the confusing part to come.
It never did.
So trust me. You can do this. No fear. I’m going to break it all down for you in this week’s blog.
Step 1: Get the right cucumbers.
You need to get pickling cucumbers. If you try to do this with normal cukes, they’ll be mushy.
Step 2: Wash your Mason jars and your pickles.
Brianne used 1/2 gallon jars. I use quarts. It’s up to you. If the pickles still have a little dirt on them — it’s okay. Remember, good bacteria lives in that soil.
Step 3: Soak the pickles whole in a bowl of ice water for 15 minutes.

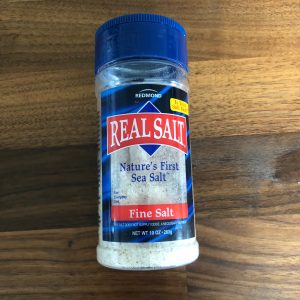
The type of salt matters. Using a sea salt with minerals is best when fermenting.
This was new to me. Apparently this is one of the “hacks” to a crisp pickle. Skip this step and your crunch will show it.
Step 4: Prepare the salt brine.
The brine solution changes depending on what you’re pickling. For cucumbers, Brianne used 4 cups of water to 3 T. pink Himalayan sea salt. This should be enough for 2 quarts.
FYI: The salt variety matters. Brianne said to stay away from Morton’s iodized salt. We want the salt that is full of minerals.
The water quality also matters. If you have city water, you should filter it to remove the chlorine which will mess with the formation of good bacteria. Well water is ideal. Avoid distilled water.
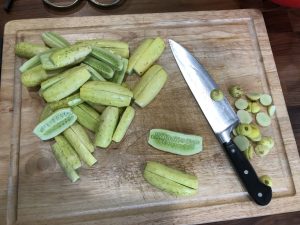
Step 5: Slice the cucumbers.

Slice your cucumbers in whatever shapes you like.
You can keep them whole or slice them into spears or coins.
Step 6: Place the pickles into the Mason jar. Add any additional flavorings and a black tea bag.
Brianne recommended adding in a clove of garlic, a few pieces of sweet banana pepper, and onion slices. Throw in some dill weed if you want.
HACK: Another mind-blowing tip I learned here was to add a black tea bag to each quart jar. (Don’t remove the casing, just throw the whole bag in). The tannins in the black tea will help the pickles stay crisp.
Unlike with canning recipes, you don’t need to worry about pH levels and straying from a recipe here. Add in whatever suits your fancy.
Step 7: Pour the salt brine over the cucumbers in the jar, making sure to cover the contents completely.
You’ll need to place some kind of weight on top of the pickles to keep them underwater. You can just use a big onion wedge, or if you start to ferment a lot, you might want to invest in some reusable glass fermentation weights from Amazon.
Step 8: Close the jar with the lid (or the burp lids). Let sit on counter for 3 days.
Here’s where the magic starts to happen. The bacteria will begin to react with the contents of the jar, and produce carbon dioxide. You’ll see bubbles coming to the surface.
Step 9: Burp the jars.
You’ll need to check the jar every morning and “burp” it. Just open the lid and allow the trapped air to escape. If you’re worried you’ll forget to do this, you can invest in some “airlock lids” from Amazon. These are made of silicone and have a release valve that automatically lets air out, but doesn’t let air in.
Step 10: Store in fridge.
Check after 3 days and taste one. If it tastes pickle enough, then put the jar in the fridge. You’re done. If not, leave it out another day and check again. Putting the pickles into the fridge stops the fermentation process. They will last up to a year in your fridge.
That’s it folks.
You are literally done with prep in 30 minutes without heating up your kitchen to God-awful temperatures. And you can start eating them in 4 days. Add a pickle to each of your main meals, and you’ll soon have a happy healthy gut.
Do you like learning simple ways to make farm fresh food taste out of this world?
If so, you would LOVE our SLFarms Membership Academy. The Academy is our online training library where we’ve stored all our past 2 years of video trainings on every vegetable we grow, our 40+ veggie ebooks, cheatsheet PDFs, our Instant Pot mini course, our “Roadmap to CSA Success” course, our monthly canning club trainings, and downloadable step-by-step guides.
This Academy comes free with a CSA membership in our farm. But it can now be purchased out-right by ANYONE who just wants some support in eating farm fresh food.
Each week we upload a new video or resource into the library. Academy members can access all of these resources whenever they want — and even from their mobile device too! You also get access to our private Facebook community of foodie super-users. You can join at our monthly rate of just $7 or save some money and join at our annual rate of $65.
Learn more here.
