CSA Week 6 Newsletter July 26, 2020
CSA Newsletter Week 6
July 26 – August 1, 2020 | “B” Week
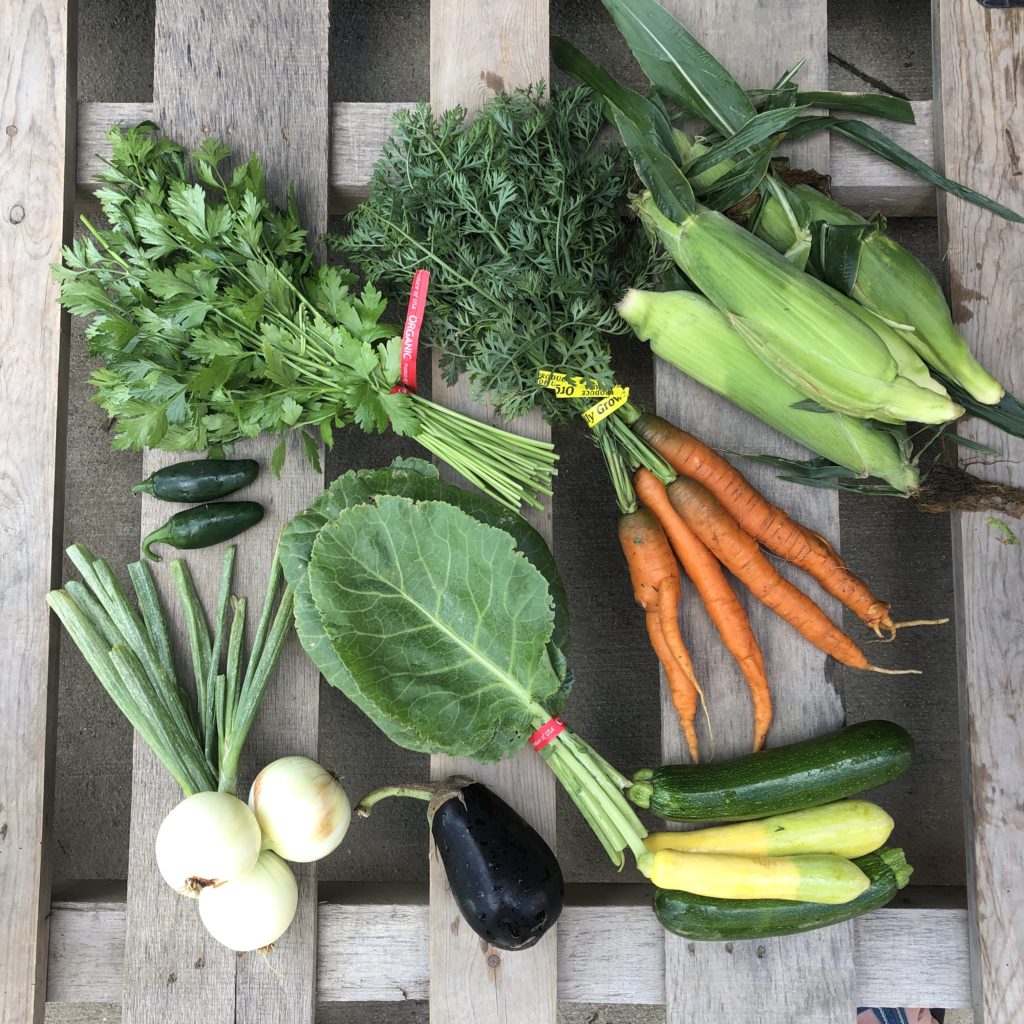
COLLARDS (1 BUNCH) ~ (from our partner farm Wayward Seed Farm in Fremont, OH) Store these in a Debbie Meyer Green bag or Tupperware FridgeSmart container right away and leave it in the fridge. Use within a week. This crop technically falls into the category of “danger zone veggies” — ie they have a short shelf life. So use them or freeze them early in the week.
PARSLEY ~ Store parsley in your Debbie Meyer green bag with a paper towel in your fridge. It will last about a week.
ORANGE CARROTS ~ Store the roots dry and unwashed in a plastic bag in the refrigerator for up to 4 weeks. Take the tops off the carrots and store them separately as soon as you get home.
ZOEY SWEET ONIONS ~ These are not cured, so they will need to be stored in the fridge. Wrap these in a Debbie Meyer Green Bag and store in the fridge.
CUCUMBER ~ Store in the fridge crisper in a Green bag and use within a week. You don’t need to peel them.
JALAPENO ~ Store in the fridge in a Green bag. Use within 2 weeks. Be careful when slicing them. The ribs and the seeds are hot. For a milder pepper, remove the ribs and seeds. Consider wearing gloves when handling.
EGGPLANT ~ Store in the fridge in a Green bag. Use within 7 days. Cut the skin off and chop into rounds or cubes.
SWEET CORN (NOT ORGANIC) ~ These will be passed out as an “extra” in a special plastic bag along with your bin. Store sweet corn in its husk in the fridge. Corn will turn starchier the longer you store it, so try to enjoy it in the first 3-5 days.
SUMMER SQUASH (4 pieces) ~ You will get some variety of Yellow Zephyr, Green Zucchini, or Patty Pan squashes. Try grilling these, zucchini fries, making zucchini boats, sauteing in olive oil, or roasting. To store, place in a Debbie Meyer Green bag and put in the fridge. Try to use it within 6-7 days, as sometimes they can start to mold fast. You’ll get better storage results in the Fridgesmart container. To use: rinse under water to remove the dirt or prickles, and slice off the stem and blossom ends. Then slice or chop.
FRUIT SHARE
BLACKBERRIES – store these in their plastic half pint containers in the fridge or in a Fridgesmart container.
PEACHES — these will be unripe (aka hard as a rock) when you get them. Peaches are often picked unripe so they will travel easier (without bruising). If you leave them on your counter for a few days, they will eventually soften up and taste delish.
CANTALOUPE — from Bench Farms, Cut these down the middle, scoop out the seeds, and slice into the orange-cream, fruity flavor.
MADDIE & BELLA COFFEE SHARE
Mexican High Grown Altura: crisp/full/sweet

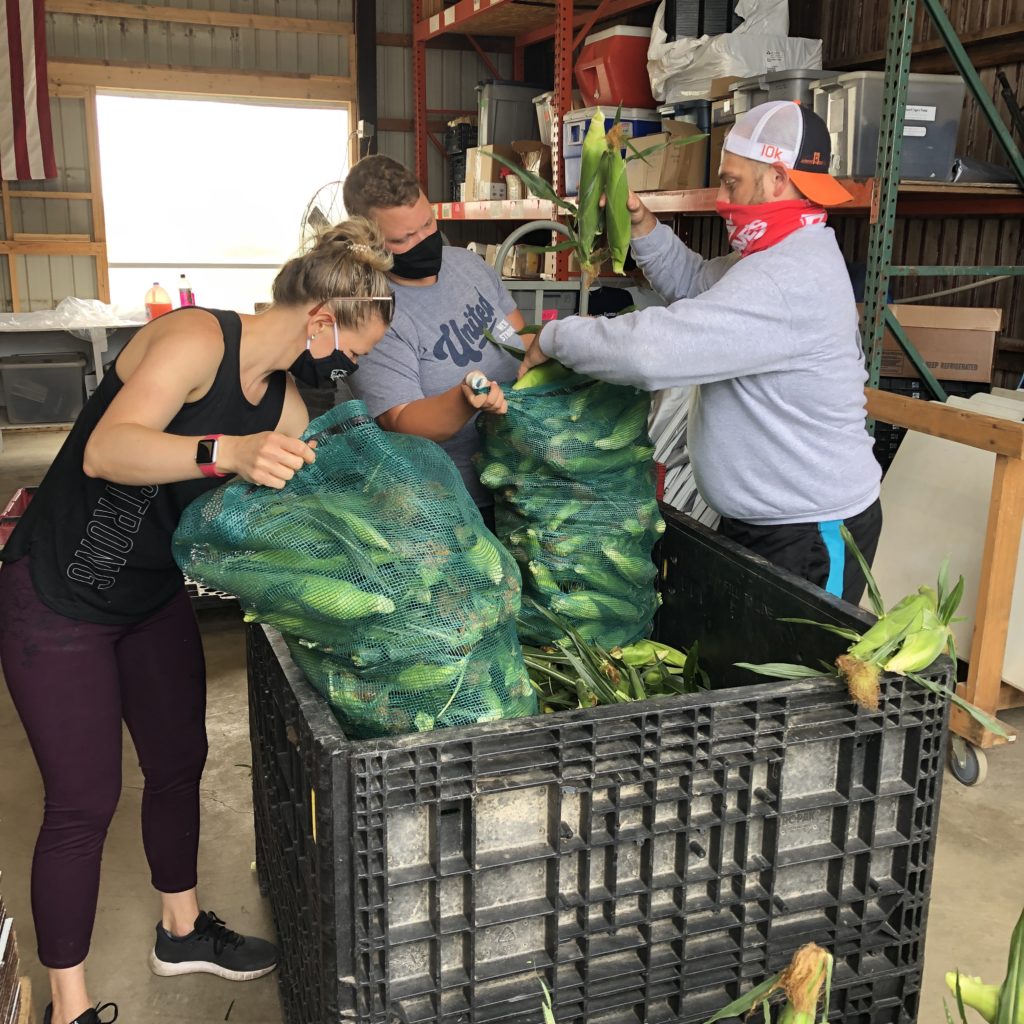
Zach and Kurt pick sweet corn for the CSA boxes. We use a giant conveyer with a backboard so that the pickers simply throw the corn onto the conveyer as they walk the field.
Two Kinds of Flowers on Zucchini Plants
If you’ve ever grown a zucchini in your garden, you know how prolific it can be. Even for one family, one plant will keep producing zucchini after zucchini until you can’t figure out what to do with them.
If you’re especially attentive, you may have ALSO noticed that each zucchini “fruit” gets its start from a fertilized flower. The flower is fertilized and then a zucchini begins to grow behind it. (The flower blossom eventually dies off).
But have you ever noticed that not every flower turns into a zucchini? Why?
That’s because each zucchini plant produces both male and female flowers interchangeably. Actually it’s a set pattern: roughly three male flowers for every one female. Over and over again.
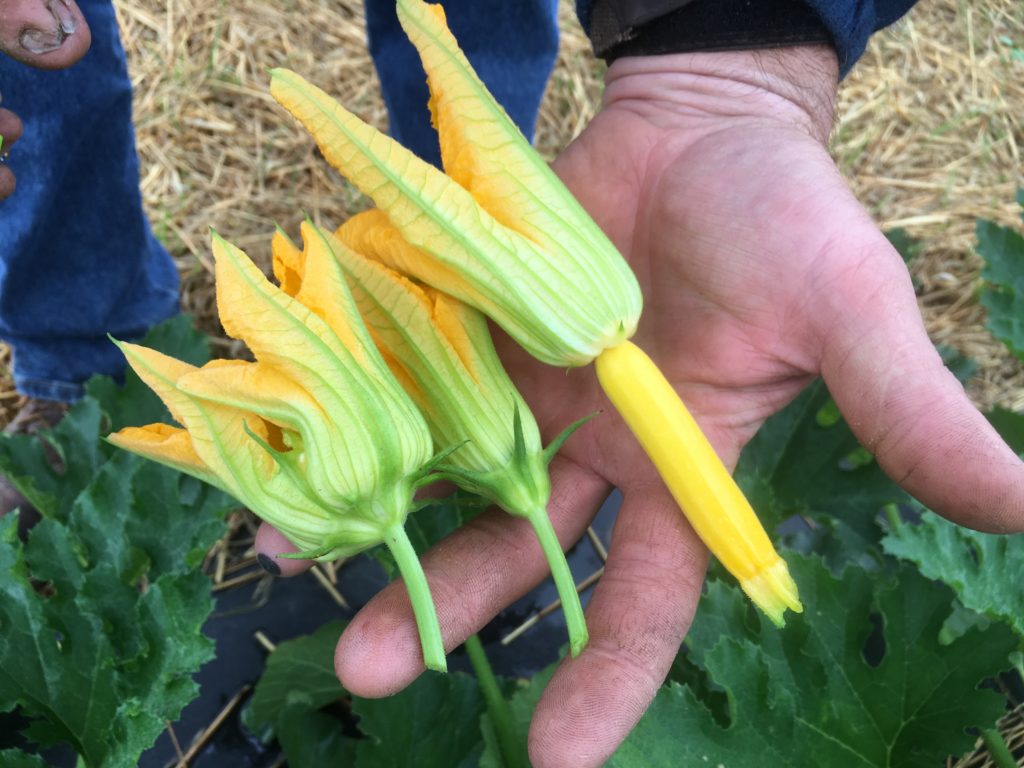
The female flower is on the right and has a bulbous stem. The male flowers are on the left and have a “normal” stem.
You can tell the two types of flower apart. The bigger male flower has a simple stem behind the flower and a stamen inside. The female flower has a bulbous ovary (that looks like the beginning of a zucchini plant), and a stigma inside the flower.
When the flowers open, the pollinators are attracted by the bright yellow color and come inside for a treat. As they buzz from flower to flower, they transfer the pollen from the male to the female. Here’s the tricky part though: The male and female flower must be open at the same time for fertilization to happen.
So Mother Nature increases the odds of fertilization by having 3 male flowers for every female. If a female gets pollinated, it will grow into a zucchini. The male flowers will die off.
If you have a garden, and your squash plants are not producing, it may mean that you don’t have enough squash flowers open at the same time. You can either plant MORE squash plants next time to increase the odds, or you can help your flower friends along and hand-pollinate the females using a Q-tip.
Zucchini sex! Isn’t it cool?
PS: you can eat the squash blossoms of any summer squash. Chefs go a little crazy over them. I’ve used them as a pizza topping, but you can also stuff them with rice/meat/beans.
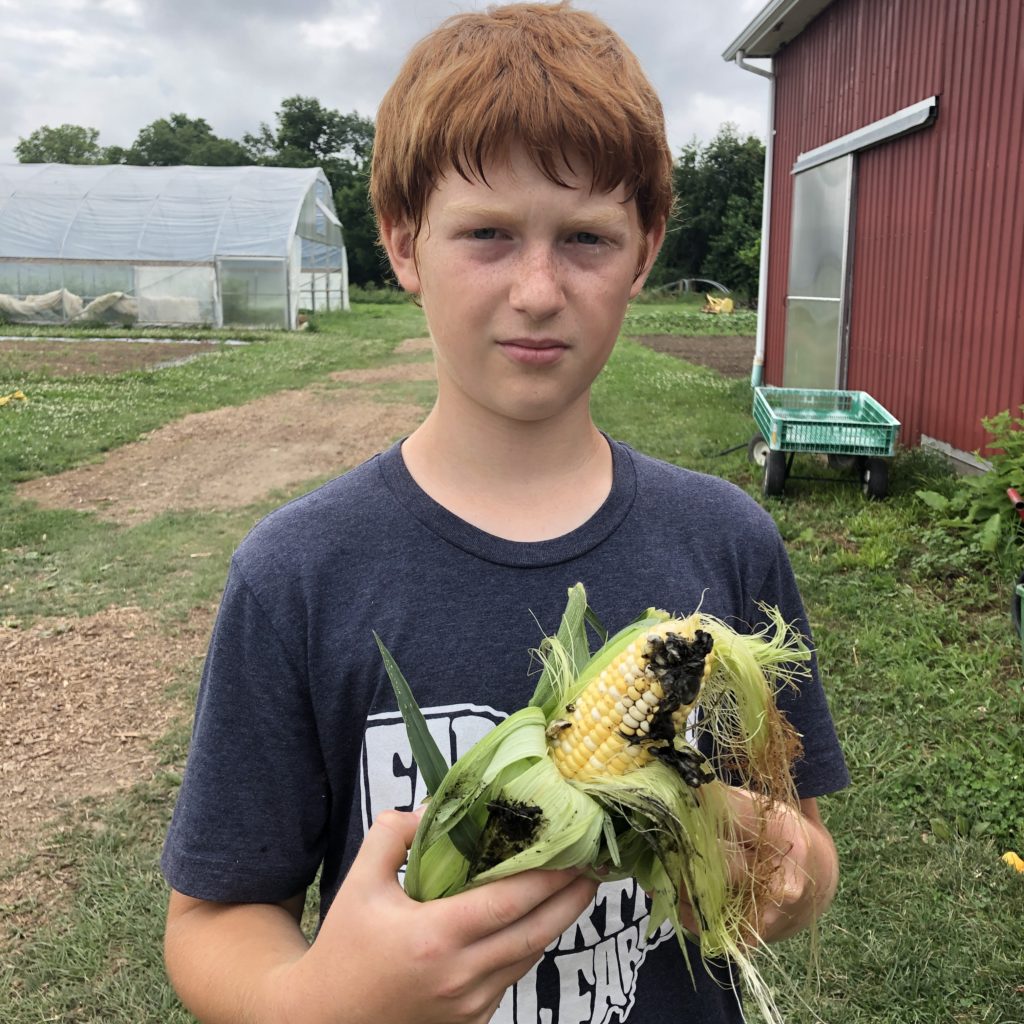
Did anyone find a black, fuzzy white mold growing on their corn? If so, it’s a delicacy! Called corn smut, it’s prized in Mexican cooking.
FARMER KURT’S FIELD NOTES
The garlic was “cleaned” this week. What does that mean?… Well the entire plant/garlic stalk is pulled and left to dry on a wagon in the shade. Then the top part of the long dry stalk is cut off with pruners. We trim the roots, and lay them on a table to dry out some more. This process is called “curing.”
Did you enjoy the sweet corn surprise last week? We’ll be having corn for the forseeable future here. My dad just did his last planting of corn yesterday to ensure that we have some through week 15. This is called “succession planting.” I have to constantly stay on my toes to make sure I’ve got new crops getting planted on certain weeks, to make sure we have a constant stream of 7-10 products through 18 weeks. This is one of the difficult parts of being a CSA farmer — managing the diverse crop “pipeline.”
The boys moved the “baby” chickens into the adult coop this week. Well they’re not babies anymore, are they? If you’re used to seeing them in their “chicken tractor” pen by the house, you’ll notice that they are now gone. (We initially have to keep them separated from the adults until they can hold their own size-wise, or they’ll get pecked and terrorized by the senior ladies).
Moving these hens to the giant Chicken Palace in the back acreage is not an easy task, however. Over the years, we’ve tried lots of methods. We’ve settled on a bin transfer method. We take a really big Rubbermaid tote and place about 6 chickens inside with a lid on it. Then we transport them on the back of the Gator to release them inside the new coop. The ladies are always a little freaked out when they get put into that bin for 10 minutes. And watching the boys figure out how to “catch” the chickens to put them into the bin in the first place is hilarious. This year, they lured them out with food and then grabbed them one by one. But the chickens got wise to the tactic, and the final 2 bunches had to be literally “chased” around the yard and plucked up one by one.
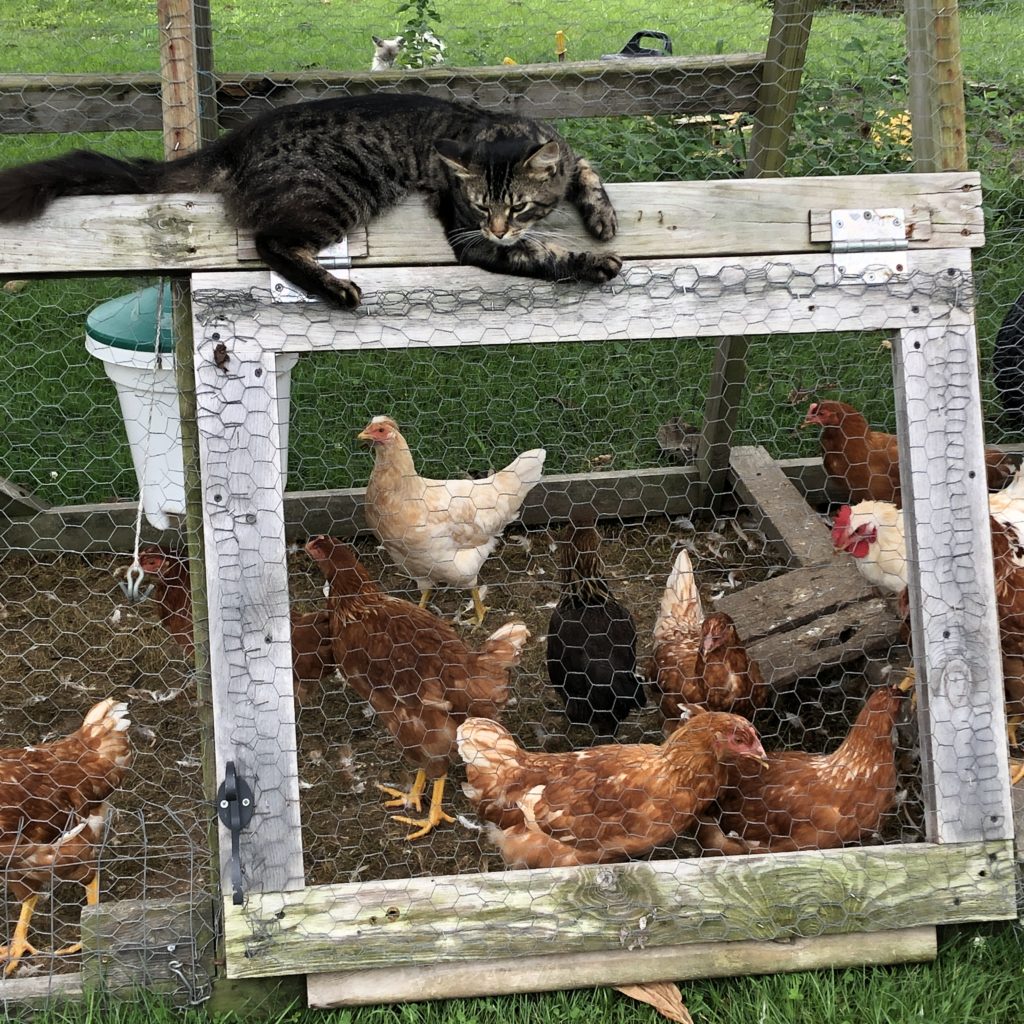
Dragon the farm cat hungrily waits for Jed and Josiah to open up the coop and let out the next batch of chickens.
Managing my time has been tricky the last few weeks. I’ve got 7 crew members now so in theory that should be helping me knock things out. I had great plans for how I’d be able to get all the jobs done with an expanded crew and give me some flex time. But I’ll be honest… I still haven’t figured out the best workflow. Part of the issue is that there are so many daily chores that I have to stay on top of — things like sweet corn picking (2-3 hours a day in the early morning), summer squash harvest (which never seems to end), and the ever-constant weeding. Soon we’ll be adding daily tomato picking to the list. And that’s just the “maintenance mode.” Add to that our CSA harvests and planting schedule, spraying for bugs and regular irrigation duties, and I feel like I’m spinning 7 plates at once.
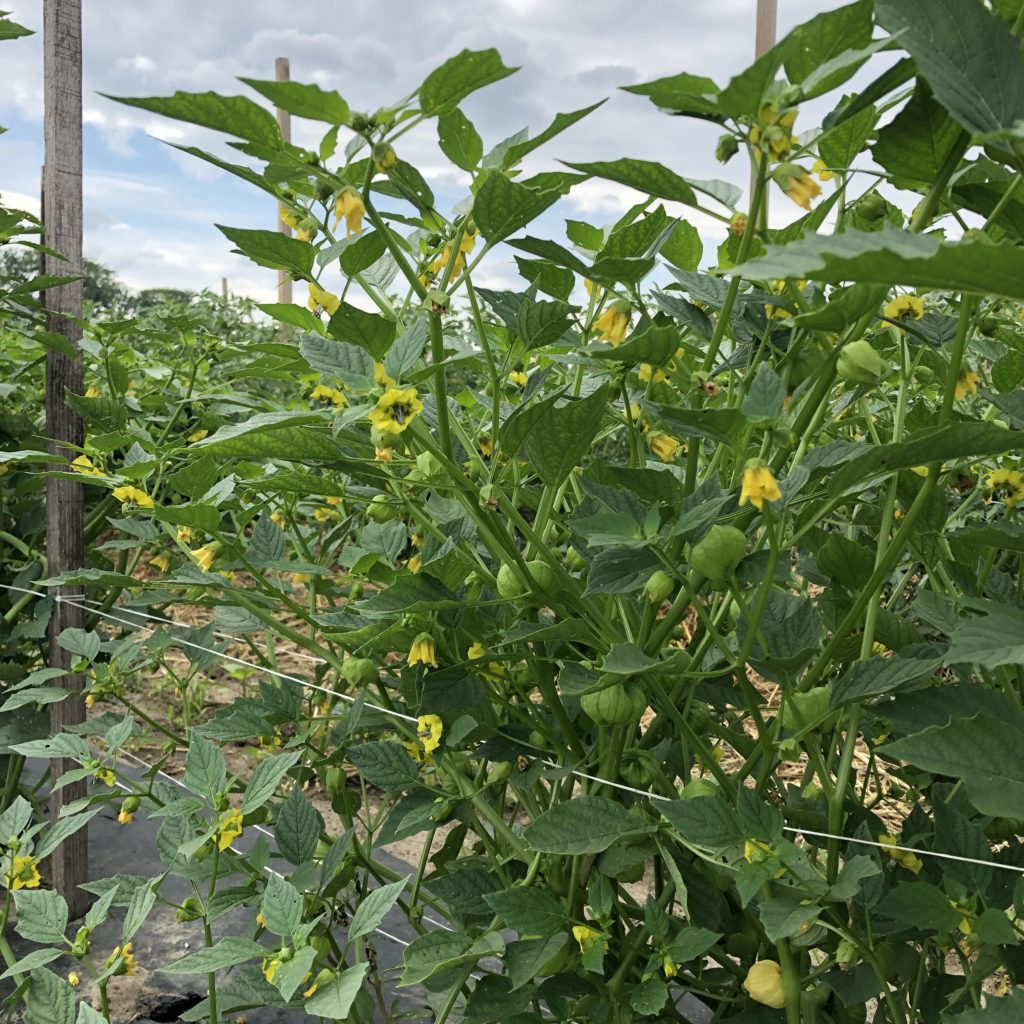
Do you see the small husk-like fruits growing on this plant? That’s our ground cherries!
The cooler is operational! My electrician was able to wire things up for me, so that we now have the expanded cooler running full throttle. Compared to last year, there is so much more room! I’ll be able to pallet jack multiple bins of corn or melons into the space now AND still have room for all the cucumbers and winter squash. My dad’s cooler unit went down this week, so we are now trying to source an AC unit for HIS CoolBot. Looks like the earliest we’ll be seeing that arrive is August 7th due to COVID shipping delays, so my cooler may end up fuller than usual while we store his products.
My cousin Glen is still working on the “bonus room” in the barn. We’ll be using that space to store clean harvest bins and CSA totes. I can’t wait to see how that opens up the space on my wash bay and pack shed floor.
For all your Elmore customers, the Elmore Bridge is now open! No more long detours to get to our place. What a relief! It couldn’t come at a better time. My dad is making daily treks to his own roadside stand in Curtice from our farm via tractor/wagon, so that detour was a real bear. The road crew finished the project several months ahead of schedule. The project engineer, Cindy Butler, is actually a member of our CSA and a good friend of Corinna’s, so we’ve been able to get the inside scoop from her on the project’s progress.
And on a personal note, our house has fleas. If you’ve ever had this happen, you know what a pain it is. My poor wife has tried bombing the house, vacuuming multiple times a day, spraying the carpets… we’re getting closer, but my poor ankles are eaten up.
~Your Farmer, Kurt
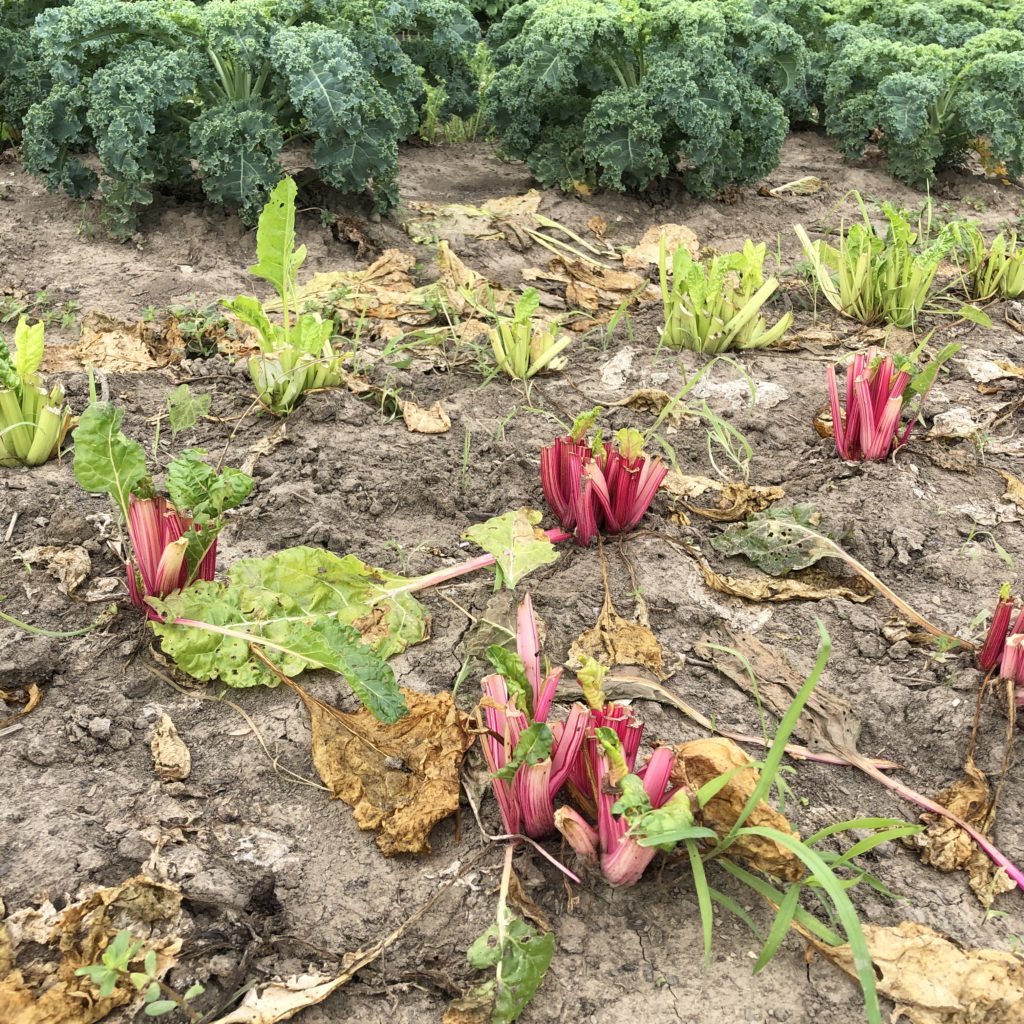
These are the remaining vestiges of the chard plants we cut for last week’s box. They will regrow in a few weeks, and we’ll get one more cutting off of them.
WEEK 6 ANNOUNCEMENTS
- Bulk Blueberries Update: I was deluged with orders for bulk blueberries — around 175 boxes! I have gone through all the emails and Facebook posts and made a master list. Please wait until you hear from me via email that your box is coming. My hope is to get them all delivered to you within 2 weeks.
- ELMORE CUSTOMERS! The Elmore Bridge is now open! No need to detour anymore!
- BULK BEETS will be for sale in our online store this week, starting Sunday. We sell beets in peck baskets which are 12 lbs. www.sharedlegacyfarms.com/store
- Watch our weekly Live Unboxing video this Tuesday around 8 PM inside the private Facebook group. Cadie Jardin, our CSA coach and dietitian, will show you what’s in the box, share storage tips and ideas for how to use your product. You can find the Facebook group at this link.
- You can order additional items from the Shared Legacy Farms online store. Our store link is super easy to remember: www.sharedlegacyfarms.com/store ==> grab some syrup or bonus veggie items (like an extra bunch of carrots). Just be sure to select the right pickup site that coincides with your pickup location. If the pickup option is greyed out or not available, it means you missed the window to order. You need to place your order 2 days before your site. I reload the store and set new pickup dates on Sunday afternoon.
 WEEK 6 CSA RECIPES
Members: You can download these recipes as a PDF inside the Membership Academy.If you aren’t a member of this year, email Corinna at slfarms2@gmail.com — your entry is free as a CSA member. This week’s recipes are:
- Grilled Corn and Chipotle Pepper Pizza
- Corn and Kale Salad
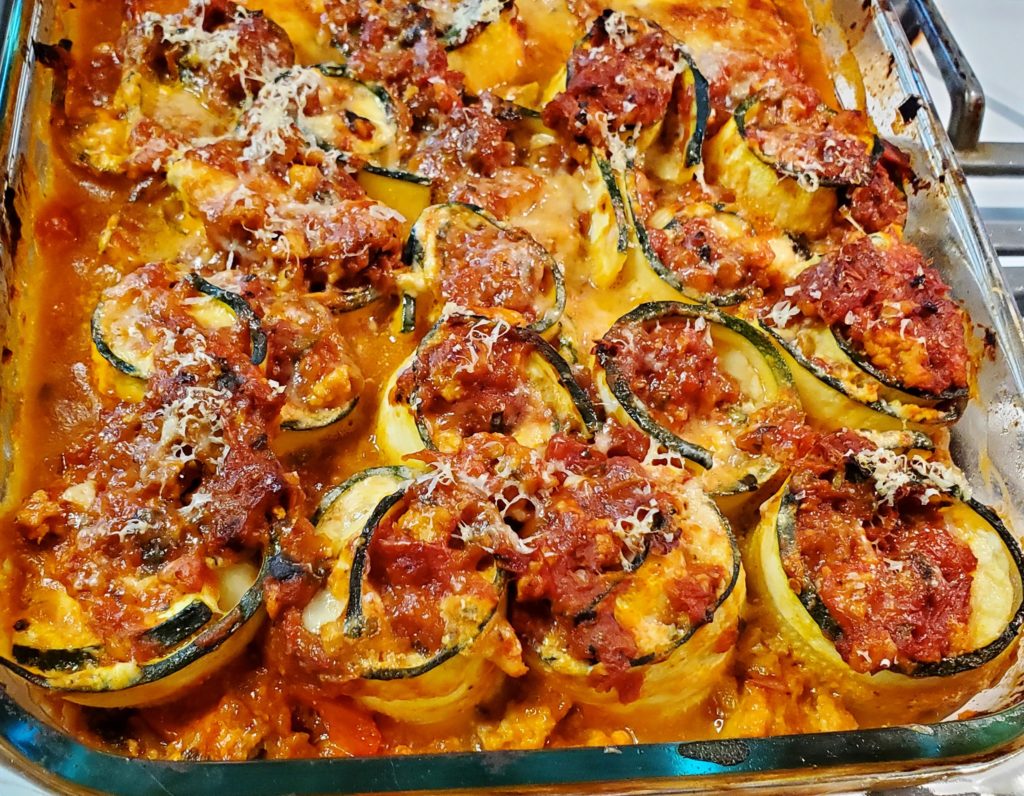
- Summer Vegetable Lasagna
- Pickled Red Onion and Carrot Relish
- Grilled Balsamic Carrots with Rosemary and Thyme
- Epic Baba Ganoush
- Honey Lime Tilapia and Corn Foil Pack
- Raw Beet and Cucumber Salad
- Quick Collard Greens
- Collard Greens and Bacon
- Summer Squash and Onions
- Cantaloupe and Cucumber Salad
- Peach Blackberry Crumble
- Peach Berry Salsa
Grilled Corn and Chipotle Pesto Pizza
Adapted from Half Baked Harvest (www.halfbakedharvest.com)
Total time ~2 hours | Serves 4
Summer pizza here we go! You could simplify this by using pre made pizza crust!
Ingredients:
Chipotle Pesto
4 in chipotle peppers adobo remove seeds for less heat if desired
½ cup fresh cilantro
½ cup fresh basil
3 Tbs pine nuts
2 cloves garlic
½ cup queso fresco crumbled
1/3 cup EVOO
salt and pepper to taste
Pizza & Toppings
1 batch of your favorite pizza dough
3 ears of corn husked
1 red pepper
1 onion peeled and quartered
2 jalapeno peppers
1 Tbs EVOO
1 Tbs butter softened
1 glove garlic minced or grated
½ tsp smoked paprika
¼ tsp salt
¼ tsp pepper
1 ½ cups sharp cheddar cheese freshly grated
8 ounces queso fresco crumbled
1 ½ cups cheery tomatoes quartered
1 avocado diced
fresh cilantro for garnish
Directions:
Prepare dough 1-2 hours ahead of time. Preheat grill to the highest setting. Shuck corn ears and brush each with olive oil and sprinkle with pepper. Wrap each in a square of aluminum foil, just so there is one layer covering the corn. Brush the red pepper, onion and jalopeno peppers with olive oil and a sprinkle of salt. Wrap the onion in a sheet of foil just like you did for the corn. Grill for about 5 minutes each “side”. Rotating the corn 4-5 times, the onion 3 times and pepper 2 times during grilling. I grilled the corn and onion for a total of 30 minutes and I took the peppers off the grill after the first 15 minutes.
While the corn onions and peppers are grilling make the pesto. In the bowl of a food processor combine the chipotle peppers, cilantro, basil, pine nuts and garlic. Pulse until combined and add the crumbled queso fresco. With the machine running stream in the olive oil and then season with salt and pepper.
Remove the peppers from the grill, when the corn and onions are ready remove those. Allow the vegetables to cool 5 minutes. Combine the butter, garlic, smoked paprika, salt and pepper in a medium size bowl. Peel the skin away from the peppers and de-seed the red pepper and the jalapeno pepper – if desired. Slice the peppers and onion into thin strips. Using a knife cute the corn away from the husk and toss in the bowl with the paprika butter.
Preheat oven to 400 degrees F.
Divide the dough in half and place each portion of dough on baking sheets (or pizza peel or pizza stone) and form into the shape you desire. Or you can also make one large pizza. Evenly spread the pesto over top of both pizzas and then place the red pepper and onion over top both pizzas. Evenly distribute the cheddar cheese between both pizzas and then add the corn to both. Top each pizza with 1 jalapeno pepper and and an even amount of queso fresco.
Bake for 25-30 minutes, until cheese is golden and bubbly. Remove and cover each pizza with the chopped cherry tomatoes, diced avocado and fresh cilantro.
Corn and Kale Salad
Adapted from Ilona’s Passion (www.ilonaspassion.com)
Total time ~15-20 minutes
I know this calls for cooked corn…but usually with the sweet corn I just add it raw and it’s SO delicious! Sub in another green if you need to.
Ingredients:
Salad-
3 cups kale chopped
½ cup chives, chopped
2 ½ cups corn, cooked
½ cup cilantro, chopped
Dressing-
¼ cup olive oil
1 lime
1 clove of garlic, crushed
¼ tsp salt
Directions:
In a large bowl mix kale, chive, corn and cilantro.
In a small glass container add olive oil. Squeeze lime juice and add it to the olive oil. Add pressed or shredded garlic and salt. Mix together.
Add dressing to the salad and mix.
Summer Vegetable Lasagna (with eggplant and zucchini)
Adapted from Serious Eats (www.seriouseats.com)
Total time 1 hour 45 minutes
You might have a few of these veggies still on hand! If you don’t have eggplant, sub in more summer squash. Use patty pan if you want!
Ingredients:
About ½ cup EVOO, divided
¾ pound zucchini (about 2 medium), ends trimmed, thinly sliced crosswise between 1/8 and 1/4 inch thick
Kosher salt
¾ pound summer squash (about 2 medium), ends trimmed, thinly sliced crosswise between 1/8 and 1/4 inch thick
¾ pound Japanese eggplant (about 2), ends trimmed, thinly sliced crosswise between 1/8 and 1/4 inch thick
15 no-boil lasagna noodles (1 box)
3 Tbs butter
3 Tbs all-purpose flour
1 quart whole milk
2 ounces freshly grated Parmigiano-Reggiano cheese
1 quart homemade or store-bought crushed tomatoes
¾ pound fresh mozzarella cheese, torn into rough chunks
Handful of basil leaves
Directions:
In a large skillet, heat 2 tablespoons olive oil over high heat until shimmering. Working in batches and being sure not to crowd the pan, add zucchini, season with salt, and cook, turning, until just tender and browned in spots, about 4 minutes per batch.
Add more oil as needed to prevent pan from drying out, and adjust heat as needed throughout to maintain a very hot, but not heavily smoking, pan. Transfer each batch to a baking sheet and spread in an even layer to cool, then transfer cooled slices to a second baking sheet or plate. Repeat with remaining zucchini, squash, and eggplant until all vegetables are lightly browned. Place lasagna noodles in a 9- by 13-inch casserole dish and cover with hot water. Let noodles soak while you prepare the white sauce, agitating them every few minutes to prevent sticking, about 20 minutes total.
Heat butter in a medium saucepan over medium heat until melted. Add flour and increase heat to medium-high. Cook, stirring butter and flour with a whisk until pale golden blond, about 1 minute. Whisking constantly, slowly drizzle in milk.
Continue to cook, whisking frequently, until mixture comes to a boil and thickens. Remove from heat and add Parmigiano-Reggiano. Whisk until smooth. Season to taste with salt. Set aside.
Season crushed tomatoes to taste with salt.
Preheat oven to 375°F and adjust rack to center position. Transfer noodles to a clean kitchen towel or layer with paper towels to dry them. Dry the casserole dish carefully and brush with olive oil. Spread a thin layer of crushed tomatoes on the bottom of the baking dish.
Layer with 3 lasagna noodles. Top with 1/4 of eggplant, zucchini, and squash, 1/5 of crushed tomatoes, and 1/5 of white sauce. Repeat layers three more times.
Place the final lasagna noodles on top and spread with remaining crushed tomatoes and white sauce. Scatter mozzarella evenly over surface and add basil leaves. Drizzle lightly with olive oil.
Cover dish tightly with aluminum foil and place in oven. Bake for 30 minutes, uncover, and continue baking until lightly browned on top. Remove from oven, let rest 10 minutes, slice, and serve.
Pickled Red Onion and Carrot Relish
Adapted from Just a Taste (www.justataste.com)
Total time ~10 minutes
Makes 2 pints
Make this and use as a flavorful condiment all week long!
Ingredients:
1 large red onion, sliced into thin rings
1 large carrot, peeled and diced
1 Cup white vinegar
3 Tbs sugar
½ tsp red chili flakes
½ tsp black pepper
1 tsp salt
Directions:
Blanch the sliced onions and diced carrots in a small saucepan of boiling water for one minute.
Strain the vegetables into a colander and then return them back to the pan.
Add the white vinegar, sugar, crushed red chili flakes, pepper and salt. Then add just enough water to cover the vegetables. Bring the mixture to a boil and cook it for one minute.
Pour the pickled relish (with the liquid) into jars and let it cool completely before sealing the jars. The relish will keep for up to two weeks in the fridge.
Grilled Balsamic Carrots with Rosemary and Thyme
Adapted from Fountain Avenue Kitchen (www.fountainavenuekitchen.com)
Serves 4
Any vegetable with balsamic is a friend of mine, swap in whatever herbs you might have in that herb garden!
Ingredients:
4 large carrots, peeled and halved lengthwise
1 Tbs EVOO
1 Tbs balsamic vinegar
1 rounded Tbs minced fresh rosemary and/or thyme (may substitute a teaspoon of dried)
Kosher salt and freshly ground pepper to taste
Directions:
Toss carrots with the olive oil, vinegar, herbs, and sprinkle with salt and pepper to taste.
Grill over medium heat about 15-20 minutes, turning a few times, or until the carrots are cooked to al dente. Exact time will depend on the thickness of the carrots.
Epic Baba Ganoush
Adapted from Cookie and Kate (www.cookieandkate.com)
Total time ~55 minutes | Serves 6
This is my go to for eggplant, adjust for taste as needed. Love having a healthy dip for the crack carrots!
Ingredients:
2 pounds Italian eggplants (about 2 small-to-medium eggplants*)
2 medium cloves of garlic, pressed or minced
2 tablespoons lemon juice, more if necessary
¼ cup tahini
⅓ cup EVOO, plus more for brushing the eggplant and garnish
2 Tbs chopped fresh flat-leaf parsley, plus extra for garnish
¾ tsp salt, to taste
¼ tsp ground cumin
Pinch of smoked paprika, for garnish
Serving suggestions: warmed or toasted pita wedges, carrot sticks, bell pepper strips, cucumber slices, etc.
Directions:
Preheat the oven to 450 degrees Fahrenheit with a rack in the upper third of the oven. Line a large, rimmed baking sheet with parchment paper to prevent the eggplant from sticking to the pan. Halve the eggplants lengthwise and brush the cut sides lightly with olive oil. Place them in the prepared pan with the halved sides down.
Roast the eggplant until the interior is very tender throughout and the skin is collapsing, about 35 to 40 minutes (this might take longer if you are using 1 large eggplant). Set the eggplant aside to cool for a few minutes. Flip the eggplants over and scoop out the flesh with a large spoon, leaving the skin behind.
Place a mesh strainer over a mixing bowl, then transfer the flesh to the strainer and discard the skins. Pick out any stray bits of eggplant skin and discard. You want to remove as much moisture from the eggplant here as possible, so let the eggplant rest for a few minutes and shake/stir the eggplant to release some more moisture.
Discard all of the eggplant drippings, drain and wipe out the bowl, and dump the eggplant into the bowl. Add the garlic and lemon juice to the eggplant and stir vigorously with a fork until eggplant breaks down. Add the tahini to the bowl and stir until it’s incorporated. While stirring, slowly drizzle in the olive oil. Continue stirring until the mixture is pale and creamy, and use your fork to break up any particularly long strings of eggplant.
Stir in the parsley, salt and cumin. Season to taste with more salt (I usually add another ¼ teaspoon) and more lemon juice, if you’d like a more tart flavor.
Transfer the baba ganoush to a serving bowl and lightly drizzle olive oil on top. Lastly, sprinkle parsley and smoked paprika on top. Serve with accompaniments of your choice. It’s also great on sandwiches!
Homey Lime Tilapia and Corn Foil Pack
Adapted from Delish (www.delish.com)
Total time ~30 minutes | Serves 4
I know this recipe calls for tilapia, but any white fish would work. Foil packs are a great way to avoid extra dishes in the summer!
Ingredients:
4 fillets tilapia
2 T honey
4 limes, thinly sliced
2 ears corn, shucked
2 T fresh cilantro leaves
¼ cup EVOO
kosher salt
Freshly ground black pepper
Directions:
Heat grill to high. Cut 4 sheets of foil about 12″ long.
Top each piece of foil with a piece of tilapia. Brush tilapia with honey and top with lime, corn and cilantro. Drizzle with olive oil and season with salt and pepper.
Grill until tilapia is cooked through and corn tender, about 15 minutes.
Raw Beet and Cucumber Salad
Adapted from Bon Appetit (www.bonappetit.com)
Serves 8
There’s a lot of slicing involved, but this is a great way to use up some left over beets and a BUNCH of fresh herbs!
Ingredients:
4 small Chioggia (candy-stripe) and/or yellow beets, peeled, halved, very thinly sliced
½ English hothouse cucumber, some peel removed in thin alternating strips, halved lengthwise, thinly sliced
2 Persian or kirby cucumbers, some peel removed in thin alternating strips, thinly sliced
6 scallions, white and pale-green parts only, sliced into 2-inch-long thin strips
2 Fresno chiles, very thinly sliced
1 Hungarian wax chile, very thinly sliced
Zest of 1 lemon, removed in wide strips, very thinly sliced
5 ounces ricotta salata (salted dry ricotta), crumbled
2 cups torn mixed tender herbs (such as basil, mint, parsley, cilantro, and/or fennel fronds)
¼ cup (or more) Sauvignon Blanc vinegar, preferably late harvest
½ tsp sugar
2 tsp poppy seeds, plus more
Kosher salt, freshly ground pepper
Olive oil (for drizzling)
Directions:
Toss beets, both cucumbers, scallions, both chiles, lemon zest, ricotta salata, and herbs in a large bowl to combine.
Add vinegar, sugar, and 2 tsp. poppy seeds, season with salt and pepper, and drizzle with oil. Toss salad gently to coat. Taste and drizzle with more vinegar if needed.
Transfer salad to a platter, lightly drizzle with more oil, and sprinkle with more poppy seeds.
Quick Collard Greens
Adapted from Cookie and Kate (www.cookieandkate.com)
Total time ~ 15 minutes | Serves 2
Really easy way to enjoy these greens, make sure to squeeze the lemon on when serving!
Ingredients:
1 large bunch (about 10 ounces) collard greens
1 ½ Tbs EVOO
¼ tsp fine sea salt
2 medium cloves garlic, pressed or minced
Pinch of red pepper flakes (optional, scale back or omit if sensitive to spice)
A couple lemon wedges, for serving
Directions:
To prepare the collards: Cut out the thick center rib out of each collard green. Stack the rib-less greens and roll them up into a cigar-like shape. Slice over the “cigar” as thinly as possible (⅛″ to ¼″) to make long strands. Shake up the greens and give them a few chops so the strands aren’t so long.
Heat a large, heavy-bottomed skillet over medium-high heat, then add the olive oil. Once the oil is shimmering, add all of the collard greens and the salt.
Stir until all of the greens are lightly coated in oil, then let them cook for about 30 seconds before stirring again. Continue stirring in 30-second intervals until the greens are wilted, dark green, and some are starting to turn browns on the edges (this is delicious). This will take between 3 to 6 minutes.
Once the collards are just about done, add the garlic and red pepper flakes (if using). Stir to break up the garlic and cook until it’s fragrant, about 30 seconds. Remove the pan from the heat.
Immediately divide the cooked collards onto plates, and serve with a lemon wedge each.
Collard Greens with Bacon
Adapted from Savory Spice (www.savoryspice.com)
Total time ~ 15 minutes
Greens and carrots, great combination and a tasty way to introduce your family to greens.
Ingredients:
6 slices bacon, diced
4 carrots, diced
1 onion, diced
4 tsp lemon pepper
¼ tsp garlic, minced
¼ tsp crushed red pepper flakes
3 Tbs balsamic vinegar
4 (10 oz.) packages fresh, chopped collard greens
2 cups chicken broth
Directions:
Cook bacon in a large Dutch oven (or similar pot) over medium-high heat until just crisp; transfer to a paper towel-lined plate to drain.
Add carrots to pot with bacon drippings and cook over medium-high heat for 5 min. Add onions and cook another 5 min., or until carrots and onions soften and begin to brown. Stir in lemon pepper, garlic, crushed red pepper, and vinegar and cook for 1 more min.
Add reserved bacon, collard greens, and broth and bring to a boil. Reduce to a simmer, cover, and simmer for 1 hour or until greens are tender. Serve.
Summer Squash & Onions
Adapted from Saving Dessert (www.savingdessert.com)
Total time ~35 minutes | Serves 10
This is a super simple, traditional way to enjoy these seasonal veggies. Add some fresh herbs for even more flavor!
Ingredients:
1 Tbs EVOO
1 Tbs butter
1 large or 2 small sweet onions, chopped or sliced
2 medium zucchini, chopped or sliced
3 yellow squash, chopped or sliced
1 (15 ounce) can diced tomatoes with basil, oregano and garlic (do not drain)
1 tsp freshly ground pepper
1 tsp seasoning salt
Directions:
Warm a large skillet over medium heat. Add the olive oil and butter. Once the butter is melted, add the chopped onions and sauté until crisp tender and starting to brown, about 5 minutes.
Add the squash, zucchini, tomatoes with juice, pepper, salt.
Heat until boiling. Cover and cook over medium-low until the squash is crisp tender but not falling apart. Remove the lid and boil until some of the liquid is evaporated.
Cantaloupe and Cucumber Salad
Adapted from Bon Appetit (www.bonappetit.com)
Serves 4
Super refreshing and loaded with flavor, this is a great way to spice melon up!
Ingredients:
½ cup EVOO
¼ cup Champagne vinegar or white wine vinegar
1 tsp ground coriander
1 tsp kosher salt
¼ tsp freshly ground black pepper
⅛ tsp ground cardamom
½ large cantaloupe, rind and seeds removed, flesh cut into 1-inch pieces
1 large English hothouse cucumber, sliced on a diagonal ½ inch thick
2 Fresno chiles, thinly sliced
½ cup unsalted, roasted pumpkin seeds (pepitas)
¼ cup chopped cilantro
¼ cup chopped mint
Directions:
Whisk oil, vinegar, coriander, salt, pepper, and cardamom in a large bowl. Add cantaloupe, cucumber, and chiles and toss to coat in dressing. Let sit, uncovered, 15 minutes.
To serve, add pumpkin seeds, cilantro, and mint to salad and toss gently to combine.
Peach Blackberry Crumble
Adapted from The Yellow Table (www.theyellowtable.com)
Serves 8
A great way to enjoy those summer berries, a crumble! Sub in any berries you have!
Ingredients:
5 large peaches (~5 cups), sliced with skin on
2 pints fresh blackberries
¼ cup flour
1 tsp cornstarch
1 tsp vanilla extract
¼ cup sugar
1 tsp lemon zest
1 Tbs lemon juice
1 cup all purpose flour
½ cup old fashioned oats
6 Tbs brown sugar
½ tsp salt
½ tsp cinnamon
1 stick unsalted butter, cut into small pieces
½ cup chopped pecans
Directions:
Set a rack in the middle of the oven and preheat the oven to 350°F. Butter an 11x7x2-inch ceramic baking dish.
Toss the peaches, blackberries, flour, cornstarch, vanilla, sugar, lemon juice, and zest in a large bowl. Pour into the prepared dish.
In a separate bowl, stir together the flour, oatmeal, brown sugar, salt, and cinnamon. Add in the butter and rub into the dry ingredients with your fingers until pea-size lumps form. Add in the pecans with your fingers, squeezing to combine.
Sprinkle the crumble topping over the fruit mixture. Bake for 35 to 40 minutes or until bubbling and golden brown on top. Let cool slightly; serve with vanilla ice cream.
This can be made a day ahead and reheated in the oven (let come to room temperature before putting the dish in the oven – otherwise the dish could break).
Blueberry Peach Salsa
Adapted from My Recipes (www.myrecipes.com)
Total time ~15 minutes | Makes 3 cups
This is a great addition to a cheese board or with some pork chops or chicken! Sub in blackberries or whatever berry you have. Great way to use some basil if you still have some!
Ingredients:
1 ½ cups fresh blueberries
Zest and juice of 1 lime
1 large peach, peeled and finely diced
1 small shallot, finely chopped
3 Tbs chopped fresh basil
3 Tbs chopped fresh chives
2 Tbs hot pepper jelly
1 Tbs EVOO
Directions:
Coarsely chop half of blueberries. Toss chopped blueberries with whole blueberries and remaining ingredients.
Add salt and pepper to taste.
Serve immediately, or cover and chill up to 24 hours.
